


DRILL / IMPACT DRILL
The “Impact” (hammer) mechanism may be switched “ON” or “OFF”.
NOTES: Release trigger switch and allow machine to stop before
switching between “Drill” and “Impact Drill”.
Left-Hand rotation when impact drilling will damage the machine
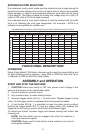
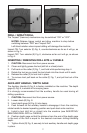
Impact ON: Turn selector (E) Fig. 5, counterclockwise as far as it will go, as
shown in Fig. 5.
Impact OFF: Turn selector (E) Fig. 6, clockwise as far as it will go, as shown
in Fig. 6.
INSERTING / REMOVING DRILL BITS or CHISELS
1. CAUTION: Disconnect tool from power source.
2. Clean and lightly grease the tool (drill bit or chisel) shank.
3. Pull back on the collar (F) Fig. 7, and hold while performing step 4.
4. Rotate the tool as you insert the tool shank into the chuck until it seats.
5. Release the collar (F) to lock tool in place.
6. To remove tool: pull back on the collar (F) Fig. 7, and pull tool out of the
machine.
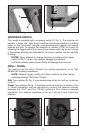
AUXILIARY HANDLE / DEPTH GAGE
The Auxiliary Handle (J) Fig. 8, is factory installed on the machine. The depth
gage (H) Fig. 8, is stored in the carrying case.
It is strongly recommended that the auxiliary handle be used during all
drilling operations.
1. CAUTION: Disconnect tool from power source.
2. Loosen knob (G) Fig. 8.
3. Insert depth gage (H) Fig. 8, into clamp.
4. Push forward on the auxiliary handle to disengage it from the machine,
rotate handle to desired operating position and push back onto machine.
5. Install a tool (drill bit or chisel) into the machine (see INSERTING/
REMOVING DRILL BITS or CHISELS).
6. Position depth gage so that the distance from the end of the depth gage
to the end of the tool is equal to the desired maximum drilling/chiseling
depth.
7. Tighten Knob (G) Fig. 8, securely to lock auxiliary handle and depth gage
in place.
7
Fig. 5
Fig. 6
E E