


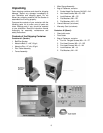

13
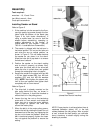
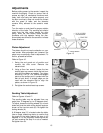
Dust Outlet and Cord Plate
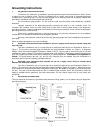
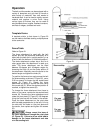
Refer to Figure 12:
1. Install the dust outlet using the four M6 x 12
pan head flanged screws (FF).
2. Single Phase model: Feed the electrical
plug through the hole in the stand, and slide
the cord plate through also. Secure the cord
plate to the stand using the two M5x12 pan
head screws (GG) as shown.
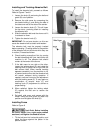
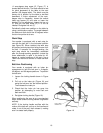
Switch (Single Phase Model)
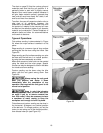
Refer to Figure 13:
1. Place the push button switch into the
rectangular opening from inside the stand.
2. Secure the switch to the outside of the
stand, using two M4x8 pan head screws
(HH), two M4 lock washers (JJ) and two M4
flat washers (KK).
Electrical Connections
Electrical connections must
be made by a qualified electrician in
compliance with all relevant codes. This
machine must be properly grounded to help
prevent electrical shock and possible fatal
injury.
The 31A Sander is equipped with either a single
phase 115/230 volt motor (pre-wired 115V); or
a three phase 230/460 volt motor (pre-wired
230V).
The three phase sander is not equipped with a
plug. You may either install a UL/CSA listed plug
suitable for 230 or 460 volt operation, or “hard-
wire” the sander directly to a service panel. The
installer shall follow local regulations and
National Electrical Code, ANSI/NFPA 70
installation requirements. If the Sander is to be
hard-wired to a panel, make sure a disconnect is
available for the operator. During hard-wiring of
the machine, make sure the fuses have been
removed or the breakers have been tripped in
the circuit to which the Sander will be
connected.
If connected to a circuit protected by fuses, use
time delay fuse marked “D”.
Make sure the voltage of your power supply
matches the specifications on the motor plate of
the sander.
Figure 12
Figure 13
(single phase model)
It is recommended that the single phase sander
be connected to a dedicated 30 amp circuit (for
115V) or 20 amp circuit (for 230V) with circuit
breaker or time-delay fuse marked “D”.
It is recommended that the three phase sander
be connected to a dedicated 20 amp circuit (for
230V) or 10 amp circuit (for 460V) with circuit
breaker or time-delay fuse marked “D”.
NOTE: Local codes take precedence over
recommendations.
Converting from 115 Volt to 230 Volt
(Single Phase Only)
To convert from 115V to 230V (1 phase model),
consult the diagrams inside the cover of the
motor junction box, to determine how to switch
the motor leads. A similar diagram is also found
at the back of this manual.
The 115V attachment plug supplied with the
sander must be replaced with a UL/CSA listed
plug suitable for 230V operation. Contact your
local authorized Powermatic service center or
qualified electrician for proper procedures to
install the plug. The sander must comply with all
local and national codes after the 230 volt plug
is installed.