


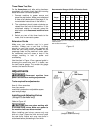


22
Basic Jointer Operation
NOTE: If you are inexperienced at jointing, use
scrap pieces of lumber to check settings and get
the feel of operations before attempting regular
work.
This section briefly discusses general rules as
well as some of the basic cuts using a jointer,
such as surfacing, edging, beveling, skewing,
rabbeting and taper cuts.
Always use cutterhead guard
(except during rabbeting) and keep hands
away from cutterhead.
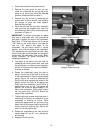
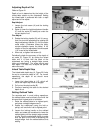
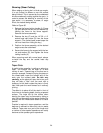
Jointing Short or Thin Work
When jointing short or thin pieces, use a push
pad or push block to eliminate all danger to the
hands. Two push blocks are included with your
jointer. Many users make their own push blocks
from scrap material to suit the particular job at
hand. Three examples are shown in Figure 31.
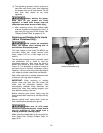
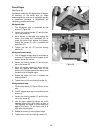
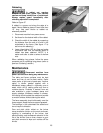
Direction of Grain
Avoid feeding work into the jointer against the
grain. This will result in chipped and splintered
edges (Figure 32). Feed with the grain to obtain
a smooth surface (Figure 33).
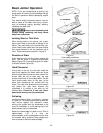
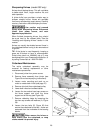
Hand Placement
At the start of the cut, the left hand holds the
work firmly against the infeed table and fence
while the right hand pushes the work toward the
knives. After the cut is under way, the new
surface rests firmly on the outfeed table. The left
hand should press down on this part, at the
same time maintaining flat contact with the
fence. The right hand presses the work forward
and before the right hand reaches the
cutterhead it is moved to the work on the
outfeed table. Follow the 3 inch rule. Never
pass hands directly over the cutterhead.
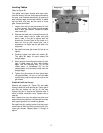
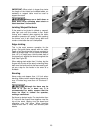
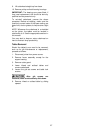
Surfacing
Jointing the face of stock, or surfacing, is shown
in Figure 34. The use of push blocks or pads will
help ensure against the operator's hands
coming into contact with the cutterhead in the
event of a kickback, or as the trailing end of the
board passes over the cutterhead.
Adjust the infeed table for depth of cut. Cuts of
approximately 1/16" at a time are
recommended, as this allows better control over
the material being surfaced. More passes can
then be made to reach the desired depth.
Figure 31
User-made pushblocks
Figure 32
Figure 33