


8
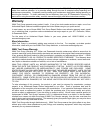
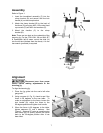
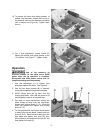
4. Using a square (A, Fig. 3), check to see if the
position of the backstop (D) is 90 degrees to
the saw table. If not, loosen the lock handle
(E), adjust the backstop to the 90-degree
position, and tighten the lock handle.
5. When the backstop is 90 degrees to the table,
adjust the setscrew (F) until it touches the
backstop. Tighten the jam nut. Setscrew (F)
acts as a positive stop and allows you to
quickly position the backstop back to the
90-degree position after it has been tilted.
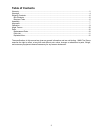
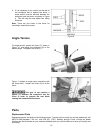
6. Loosen locking handle (G, Fig. 4). Loosen
thumbscrew (H) and move bracket (J) to the
back edge of the guide rod (K). The guide
bushing should move out with the bracket. If
the guide bushing does not move lubricate
with a light oil. Tighten locking handle (G),
and thumb screw (H).
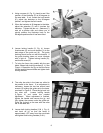
7. To bring the fence into parallel with the saw
blade, loosen both locking handles (G, L). See
Figure 4. Reposition the jig so that the fence
lies flat against the saw blade and tighten both
locking handles.
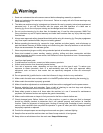
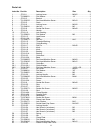
8. The miter bar slots in the base are milled to
be parallel to the fence. If an adjustment is
necessary, loosen the two hex socket head
screws (A) holding the guide rod to the base,
as shown in Figure 5. Place the jig back into
the miter slot. Loosen locking handle
(L Figure 4) and make the needed
adjustment. When adjustment is finished,
tighten the handle and remove the jig, and
fully tighten the screws under the guide rod.
Place the jig back on the saw with the miter
bar in the miter slot.
9. Loosen both locking handles (G & L, Fig. 4),
and back off jig so that the fence is
approximately 1/8" away from the saw blade
and tighten both locking handles (G & L).
Figure 3
Figure 4
Figure 5