


Ridge Tool Company
7
Removing the Workpiece
1. Raise the upper lever of the vise to release the work-
piece. Pull back on the horizontal lever to allow the
workpiece to be easily removed from the vise.
2. Slide the workpiece out of the saw keeping a firm grip
on the workpiece as it clears the saw.
To avoid injury from falling parts or equip-
ment tip-overs when handling long workpieces, make
sure that the end farthest from the saw is supported prior
to removal.
Tips For Using The Dry Cut Saw
Life of the dry cut saw blade will depend on proper use
of the saw. Procedures that should be followed are as
follows:
• Do not force the blade into the material to be cut.
• Only cut material within the specified capacity for
the saw blade.
• Let the machine reach full speed before starting to
cut.
• NEVER stop and restart with the blade in contact
with the material. This will break the teeth.
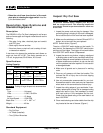
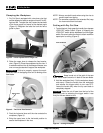
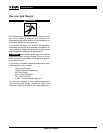
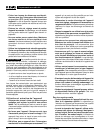
• Clamp the material correctly and ensure that is it
centered relative to the blade (Figure 6).
Maintenance Instructions
WARNING
Always be sure that the tool is switched OFF and
unplugged before changing blade or servicing saw.
Changing Saw Blade
1. Remove the power cord plug from the receptacle,
then place the plug in a location where someone
will not plug it in by mistake.
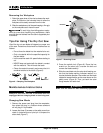
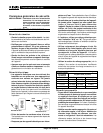
2. Loosen the three (3) screws on the safety cover then
rotate it clockwise around pivot pin to expose the
arbor shaft (Figure 7).
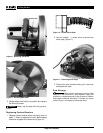
3. Press the spindle lock (Figure 8). Place the hex
wrench on the arbor bolt, unscrew the bolt and
remove the blade carefully.
4. Slide the new blade onto the arbor shaft making cer-
tain that the blade marking indicates rotation in a
counter-clockwise direction. Also make sure the blade
rotates the same direction as the arrow shown on the
safety cover (Figure 9). Then, put back the outer
flange washer and arbor bolt.
WARNING
Make sure the blade hex bolt is securely tightened.
614 Dry Cut Saw
Figure 6 – Clamping The Workpiece
WARNING
Figure 7 – Removing Cover
Pivot Pin