


10
OPERATION
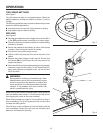
INSTALLING AUXILIARY HANDLE
See Figure 2.
An auxiliary handle is packed with the drill for ease of
operation and to help prevent loss of control.
To use the auxiliary handle:
n
Open the clamping ring by turning the handle
counterclockwise.
n
Slide the ring of the auxiliary handle onto the spindle collar
of the machine.
n
Tighten the auxiliary handle at the desired angle by
turning
the handle clockwise.
NOTE: For convenience the screw has been trapped inside
the auxiliary handle.
To prevent thread damage and possible loss of control, the
auxiliary handle should be checked periodically for tightness.
Do not operate the drill with the handle loose.
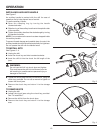
TO INSTALL BITS
See Figures 3 - 4.
n Unplug the drill.
n Insert the chuck key and twist counterclockwise.
n Insert the drill bit into the chuck the full length of the
jaws.
WARNING:
Do not insert drill bit into chuck jaws and tighten.
This could cause the drill bit to be thrown from the
drill resulting in possible serious personal injury or
damage to the chuck.
n Tighten the chuck jaws securely on the drill bit, using the
chuck key provided. Do not use a wrench to tighten or
loosen the chuck jaws.
n Remove the chuck key and return it to the storage
area.
TO REMOVE BITS
n Unplug the drill.
n Loosen the chuck jaws using the chuck key provided.
See “To Install Bits.”
n Remove the drill bit from the chuck jaws.
n Remove the chuck key and return it to the storage
area.
Fig. 2
Fig. 3
Fig. 4