


11
OPERATION
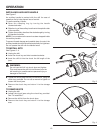
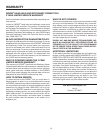
SWITCH
See Figure 5.
To turn the drill ON, depress the switch trigger. Release the
switch trigger to turn the drill OFF.
REVERSIBLE
See Figure 5.
The direction of chuck rotation is controlled by a switch
located on the body of the drill above the switch trigger. For
clockwise drilling (driving screws), the arrow on the switch
should be pointing upward on the left side of the drill and
downward on the right side of the drill.
To reverse the direction to counterclockwise (for removing
screws), the arrow on the switch should be pointing
downward on the left side of the drill and upward on the
right side.
The design of the switch will not permit changing the
direction of rotation while the drill is running. Release the
switch trigger and allow the drill to stop before changing
its direction.
CAUTION:
To prevent gear damage, always allow the chuck
to come to a complete stop before changing the
direction of rotation or the two-speed gear train
(High-Low).
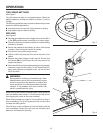
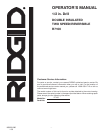
LOCK-ON BUTTON
See Figure 6.
This tool is equipped with a lock-on feature, which allows
continuous drilling for extended periods of time. To lock-on,
depress the switch trigger, push in and hold the lock-on
button located on the side of the handle, then release switch
trigger. Release lock-on button and the drill will continue
running.
To release the lock, depress the switch trigger and
release.
If you have the lock-on feature engaged during use and the
drill becomes disconnected from power supply, disengage
the lock-on feature immediately.
WARNING:
To avoid loss of control or serious personal injury,
when drilling in lock-on mode, keep your hand
positioned on the switch. This will allow you to to
stop the drill immediately in case binding occurs.
Fig. 5
Fig. 6
DIRECTION OF ROTATION SELECTOR
(FORWARD/REVERSE/CENTER LOCK)