


10 11
WARNING:
Always unplug the drill before inserting or removing bits
or adjusting the auxiliary handle assembly or depth gauge
rod. Failure to unplug the tool could result in accidental
starting causing possible serious injury.
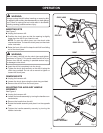
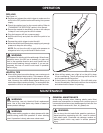
INSERTING BITS
See Figure 2.
n Unplug the hammer drill.
n Position the chuck jaws so that the opening is slightly
larger than the drill bit you intend to use.
NOTE: To open the chuck jaws, turn the chuck collar
counterclockwise. To close the chuck jaws, turn the chuck
collar clockwise.
�n Raise the front of the drill to keep the drill bit from falling
out of the chuck jaws.
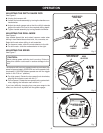
WARNING:
Do not insert a drill bit into the chuck jaws and tighten
as shown in Figure 3. This could cause the drill bit to be
thrown from the drill, resulting in possible serious injury
or damage to the chuck.
n Insert the drill bit completely into the chuck.
n Tighten the chuck jaws securely on the drill bit using the
chuck key provided. Do not use a wrench to tighten or
loosen the chuck jaws.
REMOVING BITS
n Unplug the hammer drill.
n Loosen the chuck jaws using the chuck key provided.
n Remove the drill bit from the chuck jaws.
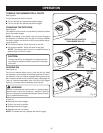
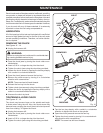
ADJUSTING THE AUXILIARY HANDLE
ASSEMBLY
See Figure 4.
n Unplug the hammer drill.
n Loosen the handle assembly by turning the handle coun-
terclockwise.
n Remove the handle from the drill.
n Rotate the handle assembly and place it on the opposite
side.
n Tighten the handle assembly securely by turning the
handle clockwise.
OPERATION
Fig. 3
Fig. 2
RIGHT
DRILL BIT
CHUCK JAWS
CHUCK COLLAR
WRONG
Fig. 4
HANDLE
AUXILIARY
HANDLE ASSEMBLY