


10
This tool has been shipped completely assembled except
for the blade.
n Carefully remove the tool and accessories from the
box.
n Make sure that all items listed in the packing list are
included.
n Inspect the tool carefully to make sure no breakage or
damage occurred during shipping.
n Do not discard the packing material until you have care-
fully inspected and satisfactorily operated the tool.
n If any parts are damaged or missing, please call
1-800-525-2579 for assistance.
PACKING LIST
Variable Speed Orbital Jig Saw
Blades (2)
Vacuum Attachment
Edge Guide
Case
Operator’s Manual
Warranty Registration Card
WARNING:
If any parts are missing do not operate your tool until the
missing parts are replaced. Failure to do so could result
in possible serious personal injury.
UNPACKING
WARNING:
Do not connect to power supply until assembly is complete.
Failure to comply could result in accidental starting and
possible serious personal injury.
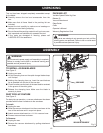
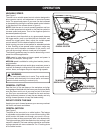
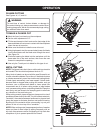
TO INSTALL JIG SAW BLADES
See Figure 2.
n Unplug your saw.
�n Lift the clamping lever on the rapid-change blade clamp
until it stops.
�n Holding the clamping lever up, insert the saw blade as
far as possible into the slot in the saw bar.
�n Check to make sure the back of the saw blade is centered
in the groove of the roller guide.
�n Release the clamping lever. Make sure the blade is
securely in place.
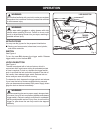
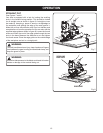
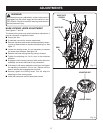
DUST PICK-UP FEATURE
See Figure 3.
For dust pick-up operation, a vacuum attachment has been
provided with the saw. It attaches to the saw base.
To Install:
n Unplug the saw.
n Slide the vacuum attachment into the curved area at the
rear of the saw base until it snaps into place.
n Attach vacuum attachment to a 1-1/4 in. vacuum hose.
n Connect vacuum hose to cleaner.
To Remove:
n Unplug the saw.
n Remove the vacuum attachment by pulling attachment
from base.
SAW BLADE
ASSEMBLY
Fig. 2
CLAMPING
LEVER
VACUUM ATTACHMENT
Fig. 3