


18
ASSEMBLY
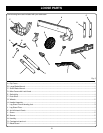
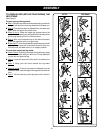
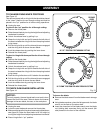
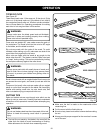
TO CHANGE RIVING KNIFE POSITIONS
See Figure 13.
This saw is shipped with a riving knife that should be placed
in the “down” position for non-through cutting and must be
placed in the “up” position for all other cutting operations.
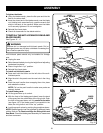
Unplug the saw.
To place in the “up” position for all through cutting:
Remove the throat plate.
Raise the saw blade by turning the height/bevel adjusting
handwheel clockwise.
Unlock the release lever by pulling it up.
Grasp the riving knife and pull it towards the left side of
the saw to release the riving knife from the spring-loaded
riving clamp.
Pull the riving knife up until the internal pins are engaged
and the riving knife is above the saw blade.
Lock the release lever by pushing the lever down.
Reinstall the throat plate.
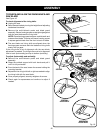
To place in riving knife down position for all non-through
cutting:
Remove the throat plate.
Raise the saw blade by turning the height/bevel adjusting
handwheel clockwise.
Unlock the release lever by pulling it up.
Grasp the riving knife and pull it towards the left side of
the saw to release the riving knife from the spring-loaded
riving clamp.
Push the riving knife down until it is below the saw blade.
Pull the riving knife up until the internal pins are engaged
and the riving knife is above the saw blade.
Lock the release lever by pushing the lever down.
Reinstall the throat plate.
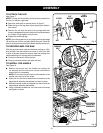
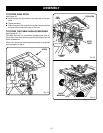
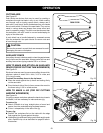
TO CHECK SAW BLADE INSTALLATION
See Figure 14.
NOTICE:
To work properly, the saw blade teeth must point down
toward the front of the saw. Failure to do so could cause
damage to the saw blade, the saw, or the workpiece.
Unplug the saw.
Lower the saw blade and remove the throat plate.
Make sure the bevel locking lever is securely pushed down,
see figure 29. Raise the saw blade to its full height by
turning the height/bevel adjusting handwheel clockwise.
Place riving knife in “up” position.
IN “UP” POSITION FOR THROUGH CUTTING
IN “DOWN” POSITION FOR NON-THROUGH CUTTING
Fig. 13
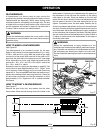
RELEASE
LEVER
(LOCKED)
RELEASE
LEVER
(UNLOCKED)
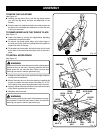
To loosen the blade:
Remove the blade wrench from the blade wrench storage
area.
Using blade wrenches, place the flat open end of a blade
wrench on the flats on the arbor shaft.
Insert the closed end of the blade wrench over the blade
nut. Holding both wrenches firmly, pull the wrench (left
side) forward to the front of the machine.