


4
MANUAL VS. AUTOMATIC CHARGING
In the AUTOMATIC positions, the charger will only turn ON when
it is connected to a battery with a voltage over .7 volts. In the
MANUAL position, the charger will turn ON under any condition.
If a battery is so depleted of charge that its voltage is less than .7
volts, switch to the MANUAL position for a few minutes before
switching to an AUTOMATIC position.
DELCO VOYAGER AND SIMILAR BATTERIES:
Some batteries, especially those with a built-in 'State of Charge'
indicator that have been deeply discharged, may require the use
of the MANUAL position in order to obtain a full charge. To bring
a Delco Voyager battery to full charge, first charge in the Auto-
matic (Maintenance Free) mode until the Full Charge LED glows,
then switch to the Manual Mode until the built-in 'State of Charge'
Indicator turns green. The AUTOMATIC position may be used to
maintain the battery at Full Charge.
DESULFATION MODE
If your battery has been left discharged for an extended period
of time, it may have become 'SULFATED'. If your battery voltage
is less than 12.2 volts prior to being charged, and the voltage
climbs rapidly when you first start charging, your battery may be
SULFATED. Under this condition, the charger enters
DESULFATION MODE (if it is in an AUTOMATIC position). In
DESULFATION MODE, the initial charging current is very small.
The charger will stay in DESULFATION MODE for 24 hours, at-
tempting to break down the sulfation. If the battery current in-
creases to normal in this time, the charger will enter the normal
AUTOMATIC MODE. If the current does NOT increase to nor-
mal, the charger will enter the ABORT state and will shut off. The
ABORT state is indicated by the rapid flashing of the RED LED.
NOTE: A buzz or hum is normal when the output cables have
been disconnected and the AC power cord is still connected to
an electrical source (i.e. wall outlet).
These types of noises will also occur when the green light comes
on indicating the battery is "Completely Charged". At this point,
the charger has stopped charging the battery, but still hums or
buzzes until the electrical power is shut off.
F. CIRCUIT BREAKER
This battery charger is equipped with a self-resetting circuit
breaker. This device protects the charger from temporary over-
loads. In the event of an overload, the circuit breaker will trip
open and after a short cooling off period will reset automatically.
This process is known as cycling and can be recognized by an
audible
clicking sound.
NOTE:
Clicking sound is normal. Wait until charger automati-
cally resets itself.
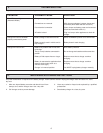
CAUTION: Persistent clicking (more than 30 minutes) may indi-
cate reverse connection or shorted battery cells. (See TROUBLE-
SHOOTING)
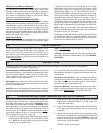
G. BATTERY TYPES
Three basic types of lead-acid batteries can be given a charge with this charger: (1) Conventional and Low Maintenance,
(2) Maintenance Free, (3) Deep Cycle / Marine.
Conventional and Low Maintenance Batteries. These are the
antimony/lead batteries. Conventional/Low Maintenance batter-
ies require periodic addition of water to the acid solution (elec-
trolyte). Additional water may be added by removing the filler
caps located on the top of the battery.
IMPORTANT: When antimony is known to be one of the materi-
als used in the battery's construction, that battery is a Low Main-
tenance/Conventional type.
CAUTION: Some Low Maintenance batteries have a relatively
smooth top without any apparent battery filler caps. If, however,
the battery manufacturer/distributor recommends periodic check-
ing of electrolyte level and provides access to the battery for
water additions, the battery is probably a Low Maintenance/Con-
ventional type.
Maintenance Free Batteries. These are calcium/lead batteries
and normally do
not require water additions. Therefore, filler caps
have been removed from the battery surface. These batteries
will have a smooth or sealed appearance.
Deep Cycle Batteries. These heavy duty batteries are used in
boats, construction equipment, sump pumps, etc. They are nor-
mally marked
DEEP CYCLE on the outside of the case.
H. OPERATING INSTRUCTIONS: CHARGING BATTERY OUT OF VEHICLE
When charging battery out of the vehicle, take care to determine
the battery type. To reduce risk of a spark near battery, follow
these steps when battery is outside vehicle. WARNING: A spark
near battery may cause battery explosion. WARNING: When
removing battery from vehicle or boat, disconnect grounded post
first. When disconnecting, make sure all accessories are off, so
as not to cause an arc. (NOTE: A marine (boat) battery
must be
removed and charged on shore. (To charge on board requires
special equipment designed for marine use.)
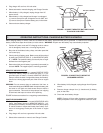
1. Check polarity of battery posts. Battery case will be marked
by each post: POSITIVE (POS, P, +) and NEGATIVE (NEG,
N, -). NOTE: The positive battery post usually has a larger
diameter than the negative post.
2. Attach a 24-inch long (or longer) 6-gauge (AWG) insulated
battery cable to NEGATIVE (NEG, N, -) battery post. (Pur-
chase cable separately.)
3. Connect POSITIVE (RED) charger clamp to POSITIVE (POS,
P, +) battery post. Rock clamp back and forth to make good
connection.
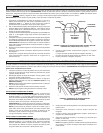
4. Position yourself and free end of 24-inch cable as far away
from battery as possible. Then connect NEGATIVE (BLACK)
charger clamp to free end of cable. WARNING: Do not face
battery when making final connection. Rock clamp back and
forth to make a good connection.
FIGURE 1 shows the connection.