


16
OPERATION cont.
8. The battery pack will become slightly warm to the touch while charging. This is normal
and does not indicate a problem.
9. Do not place the charging stand/transformer in an area of extreme heat or cold. It will
work best at normal room temperature.
10. When battery pack becomes fully charged, unplug charging stand/ transformer
from power supply and remove the battery pack.
CHARGING THE BATTERY PACK cont. (Fig. 4 and 4a)
CHARGING A HOT BATTERY PACK
When using your tool continuously, the batteries in your battery pack will become hot.
You should let a hot battery pack cool down for approximately 30 minutes before
attempting to recharge.
NOTE: This situation only occurs when continuous use of your drill / driver causes the
batteries to become hot. It does not occur under normal circumstances. Refer to
“Charging the Battery Pack” for normal recharging of batteries. If the charging stand
does not charge your battery pack under normal circumstances, return both the battery
pack and charging stand/transformer to your nearest Sears Repair Center for an
electrical check.
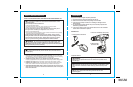
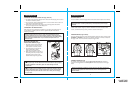
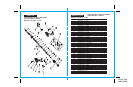
INSTALLING THE BATTERY
PACK IN DRILL/DRIVER (Fig. 5)
1. Place the Forward / Reverse Selector
Switch with Power Lock-Off into the
center position to lock the power off.
2. Place the battery pack into the drill.
Align the raised rib on battery
pack with groove inside the drill.
3. Make sure the latches on each side of
the battery pack “snap” into place, and
the battery pack is secured in the
drill/driver before beginning operation.
!
When placing battery pack in the tool, be sure raised rib on
battery pack aligns with the bottom of the drill and latches into place properly.
Improper installation of the battery pack can cause damage to internal
components.
CAUTION:
!
Cordless Battery Tools are always in operating condition
when the battery pack is installed in the tool. Therefore the Forward / Reverse
Selector Switch with Power Lock-Off should always be in the center position,
locking the power off, when the tool is not in use or when you are carrying
it at your side.
WARNING:
10-4-07 Drill
10300-10400
Fig. 5
17
OPERATION cont.
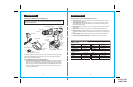
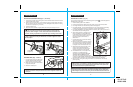
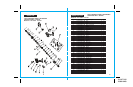
TRIGGER SWITCH (Fig. 6 and 6a)
To turn the drill ON, push the Forward / Reverse Selector Switch with Power Lock-Off to the
FORWARD or REVERSE location (see arrow direction embossed on switch), and depress
the trigger switch. To turn the drill OFF, release the trigger switch.
NOTE: You might hear a whistling or ringing noise from the trigger switch when
operating at low speeds. Do not be concerned; this is a normal part of the
switch function.
Fig. 6 Fig. 6a
C
o
m
p
a
n
io
n
5
3
1
To stop the drill/driver, release the trigger switch and the electric brake will stop the chuck instantly.
Avoid running the drill /driver at low speeds for extended periods of time. Running at low
speeds under constant usage may cause the drill/driver to become overheated. If this
occurs, cool the drill/driver by running it without a load and at full speed.
NOTE: The drill/driver will not operate unless the Forward/Reverse Selector
Switch with Power Lock-Off is pushed fully to the left (forward) or to the right
(reverse).
ELECTRIC BRAKE
FORWARD REVERSE
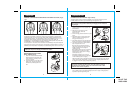
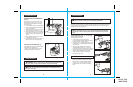
VARIABLE SPEED (Fig. 6b)
The variable speed trigger switch delivers higher speed and torque with increased
pressure on the trigger switch and lower speed with decreased pressure on the trigger
switch.
Fig. 6b