


• 14 •
TESTING SEQUENCE15.1
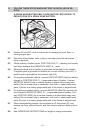
There are three basic steps required to use the 71225 as an alternator
tester.
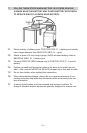
Connect the charger battery clamps to the battery or charging system. •
Connect the charger power cord to a 120V AC wall outlet. •
Start the vehicle and turn on the vehicle’s headlights. Read the voltage •
on the digital display or press the DISPLAY MODE button to set the tester
to ALTERNATOR % to read the voltage as a percent of charge.
ALTERNATOR TESTING NOTES15.2
The • DISPLAY MODE cannot be set to ALTERNATOR % during charging.
BATTERY PERCENT AND CHARGE TIME16.
This charger adjusts the charging time in order to charge the battery com-
pletely, efciently and safely. The microprocessor automatically makes the
necessary decisions. However, this section includes guidelines that can be
used to estimate charging times.
The duration of the charging process depends on three factors:
Battery State16.1 – If a battery has only been slightly discharged, it can be
charged in less than a few hours. The same battery could take up to 10
hours if very weak. The battery state can be estimated by using the built-in
tester. The lower the reading, the longer charging will take.
Battery Rating16.2 – A higher rated battery will take longer to charge than
a lower rated battery under the same conditions. A battery is rated in
ampere-hours (AH), reserve capacity (RC) and cold cranking amps (CCA).
The lower the rating, the quicker the battery will charge.
Charge Rate 16.3 – The charge rate is measured in amps. This charger pro-
vides charge rates of 2A, 12A and 30A. The 80A rate is for engine start
only. The 2A rate is for charging smaller batteries such as those used for
motorcycles and garden tractors. Such batteries should not be charged
using the 12A or 30A rate. The 12A and 30A rates are for charging larger
batteries. In the 30A mode, the charger begins at a low charge rate and
increases the charge rate if it is determined that the battery can accept the
higher rate. All charging modes will decrease the charge rate as the bat-
tery approaches maximum charge. After the charging process has started,
the digital display can be used to determine charging progress by select-
ing the BATTERY % mode.