


7
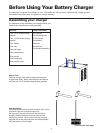
To obtain the best results from your battery charger, you must know how to use it properly. This section tells how
to set the controls and how to charge a battery in and out of the vehicle.
Using Your Battery Charger
Follow these instructions to obtain the accurate charge
level for your battery.
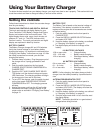
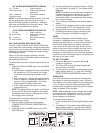
TOUCH PAD CONTROLS AND DIGITAL DISPLAY
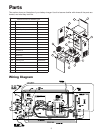
The touch pad controls and digital display for your
Timer Controlled 71233 Battery Charger and Engine
Starter are located on the front control panel. The
digital display shows volts, amps, timer minutes, air
pressure OFF and HLD. The LEDs indicate which
function is active. The touch pad controls and digital
display are explained in detail by function.
BATTERY CHARGE
The Battery Charger charges 6V and 12V batteries.
Verify the nominal voltage of your battery before
charging the battery. It is important to read and follow
“Charging Your Battery” instructions on page 10. After
the clamp connections are made, you can start
charging the battery.
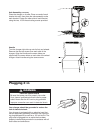
1. Connect clamp to battery. Plug the power cord of
the charger into a 3-prong grounded AC wall
outlet.
2. Push the switch located on the front panel
CHARGE SELECTOR/AIR COMPRESSOR to
CHARGE/TEST.
3. Push the VOLT AND CHARGE RATE SELEC-
TOR button until the desired voltage and amps
LED illuminates. The charging process will begin
for the amount of time set on the timer.
4. To turn OFF the charger, push the switch located
on the front panel CHARGE SELECTOR/AIR
COMPRESSOR to OFF. The charging process
will stop.
5. Unplug the power cord from the AC wall outlet.
6. Disconnect the battery charging clamps in the
proper order as outlined in “Charging Your Battery”
on page 10.
Setting the controls
BATTERY TEST
The Battery Test is based on the terminal voltage of
the battery. If the battery is installed in the vehicle,
make sure the engine and all accessories are turned
off before testing.
1. Push the switch located on the front panel to
CHARGE/TEST.
2. Press the DISPLAY MODE SELECTOR button
and select VOLTAGE.
3. Hook the battery clamps to the battery as outlined
in “Charging Your Battery” on page 10.
4. The digital display will show the voltage of the
battery:
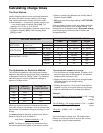
12V BATTERY VOLTAGES
12.8 or more volts = Charged battery
12.2 – 12.8 volts = Battery needs charging
12.2 or less volts = Discharged battery, needs
charging
6V BATTERY VOLTAGES
6.4 or more volts = Charged battery
6.1 – 6.4 volts = Battery needs charging
6.1 or less volts = Discharged battery, needs
charging
NOTE: If, after charging, the battery does not hold a
charge, have the battery tested by a qualified techni-
cian.
ALTERNATOR/GENERATOR TEST
1. Push the switch located on the front panel to
CHARGE/TEST.
2. Press the DISPLAY MODE SELECTOR button
and select VOLTAGE. (The display will show the
voltage of the battery.)
3. Hook the battery clamps to the battery, as outlined
in “Charging Your Battery” on page 10.
4. Start the engine and while it is at a fast idle, read
the digital display.
NOTE: The battery should be in a good state of
charge before doing this test.
3-WAY
SWITCH
DIGITAL
DISPLAY