


8
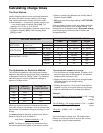
12V ALTERNATOR/GENERATOR DISPLAY
14 – 15 volts = Good condition
12.8 or less volts = Check with qualified
technician
12.8 - 14 volts or = See vehicle owner’s
15 volts or more manual
NOTE: If the digital display reads less than 12.8 volts,
the charging system may have loose fan belts, a
defective voltage regulator or alternator. Additional
tests may be required to find the exact cause. Take
the vehicle to a qualified service center.
6V ALTERNATOR/GENERATOR DISPLAY
7 – 7.5 volts = Good condition
6.4 or less volts = Check with qualified
technician
6.4 - 7 volts or = See vehicle owner’s
7.5 volts or more manual
VOLT AND CHARGE RATE SELECTOR
The VOLT AND CHARGE RATE SELECTOR allows
you to select the correct battery voltage and amp draw
rate to match your charging needs. Read the following
operating instructions for making the proper settings
for charging a battery.
When you first start charging a battery, the amp
reading will be high. As the battery becomes charged,
the reading will decrease.
To determine the amount of amps being drawn by the
battery:
1. Press the DISPLAY MODE button until the AMPS
LED lights.
a. As the battery charges at 50 amps, the reading
will decrease to 15 or 20 amps at full charge.
You should stop charging the battery at this
time.
b. When charging at 15 amps, the display should
show 15 amps for a discharged battery and 7-8
amps for a fully charged battery. You should
stop charging the battery at this time.
c. At the 2 amp charge rate, little or no display
change will occur.
NOTE: The digital display will read OL or Overload
if more than 50 Amps are supplied to the battery.
Overload means too high a charging rate. Lower
the charging rate to continue.
To determine an accurate reading of your battery’s
voltage before you charge:
1. Push the switch located on the front panel
CHARGE SELECTOR/AIR COMPRESSOR to
CHARGE.
2. Press the DISPLAY MODE button so the VOLT-
AGE LED lights.
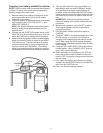
3. Connect the battery charger as outlined in “Charg-
ing Your Battery” on page 10. The voltage will be
displayed.
NOTE: If a battery has recently been charged or in
a vehicle that has been run recently, turn on the
vehicle’s headlights for a few minutes before
reading the meter to avoid getting a false reading
from a surface charge.
4. Turn off vehicle’s headlights and read the digital
display.
5. To turn OFF the charger, push the switch located on
the front panel to OFF. The charger will shut off.
6. Unplug the power cord from the AC wall outlet.
7. Disconnect the battery charging clamps as out-
lined in “Charging Your Battery” on page 10.
TIMER
The timer is designed to allow the battery to be
charged for a designated amount of time. To accu-
rately charge your battery, you must know the size of
the battery in ampere hours or reserve capacity in
units, as well as the state of charge. Since this infor-
mation is not known by the charger, the timer limit is
set at 2.25 hours to prevent the battery from over-
charging to a point where it can be severely damaged.
If you do not know the charge state of your battery, set
the timer at one hour or less.
TO SET THE TIMER:
1. Press the symbol for less time and the
symbol for more time.
2. The Timer LED will light and digital display will
show the time in minutes.
3. To turn the timer off, press the symbol until the
digital display reads OFF, or, push the CHARGE
SELECTOR/AIR COMPRESSOR switch to OFF.
TIMER HOLD
The Timer Hold feature overrides the timer allowing
the charger to continue charging for over 2.25 hours.
This feature is most often used when the charging rate
is 2 or 15 amps. Using this feature requires closely
monitoring the charge time and turning off the charger
when the battery is fully charged.
NOTE: When the battery is fully charged, the charger
and timer will NOT automatically turn off. It is impor-
tant to monitor the charge level. Not doing so may
cause damage to your battery.
To activate the hold feature:
1. Press the symbol until the Digital Display reads
HLD.
2. To release the Timer Hold, press the until the
digital display reads OFF or, push the CHARGE
SELECTOR/AIR COMPRESSOR switch to OFF.
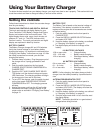
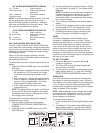
3-WAY
SWITCH
DIGITAL
DISPLAY