


ADJUSTMENTS
-13-
ADJUSTMENTS
General Information
The adjustments in this section have been
factory set and generally do not need to be
performed when you first receive your sander.
However, before operating your sander become
familiar with these adjustments, as they will
help you achieve the sanding results you want.
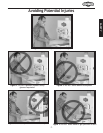
KEEP loose clothing and
long hair secured and
away from moving
parts.
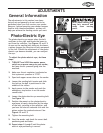
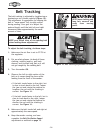
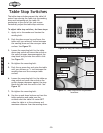
Photo-Electric Eye
The photo-electric eye senses when the belt
oscillates to the right and blocks the beam to
and from the reflector. See Figures 12 and 13.
As soon as the sanding belt obstructs the beam,
a piston changes the direction of belt movement
to the left. Should the adjustment of the photo-
electric eye become skewed, you can readjust
the eye.
To adjust the photo-electric eye, do these
steps:
1. TURN-OFF and LOCK the master power
switch so no power can go to your sander,
but keep the air pressure going into the
machine.
2. Make sure the air regulator is adjusted so
that system air pressure is 57 PSI.
3. Open both upper access doors on the sander.
4. Loosen the sanding belt tension and slide
the belt so the belt is positioned in the
middle of the rollers.
5. Apply power to the sander and push the
emergency stop button in so the sander
cannot start.
6. Loosen the photo-electric eye mounting bolt.
See Figure 12.
7. Position the mount so the photo-electric-
eye beam is barely obstructed by the edge
of the belt, pointing at the reflector, and
you hear the electric solenoid click and the
piston pushes the pushrod outward. See
Figures 12 and 13.
8. Tighten the mounting bolt.
9. Start the sander, and check for correct belt
positioning and oscillation.
10. Repeat steps 1 through 9 until the photo-
electric eye positioning is correct.
Figure 12. Photo-electric-eye assembly.
Figure 13. Photo-electric-eye reflector.
Photo-Electric
Eye Mount
Mounting
Bolt
Reflector
Photo-Electric
Eye