


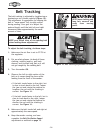
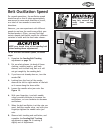


-17-
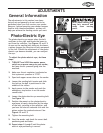
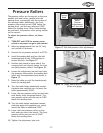
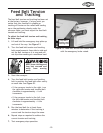
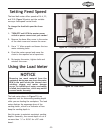
Figure 18. Gauge boards placed under pressure
rollers as a gauge.
Pressure Rollers
The pressure rollers are factory set so they are
parallel with each other, parallel with the
sanding drum, and parallel with the surface of
the conveyor table. Additionally, the front
pressure rollers must be set 0.040" below the
sanding drum, and the rear rollers at 0.020"
below the sanding drum. When these settings
are achieved, the pressure-roller spring tension
will be correct.
To adjust the pressure rollers, do these
steps:
1. TURN-OFF and LOCK the master power
switch so no power can go to your sander!
2. Make two gauge boards that are 24" long
and uniform in thickness.
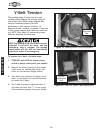
3. Connect the air pressure and set it to 57 PSI.
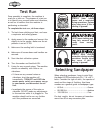
4. Install the sanding belt and turn the belt
tensioning knob to the 12:00 position to
tension the belt. See Figure 17.
5. Position each board on each side of the
conveyor belt and directly below the front
and back pressure rollers. See Figure 18.
6. Loosen the adjustment jam nuts and raise
the pressure rollers above the sanding belt
roller with the adjustment bolts shown in
Figure 17.
7. Raise the table up until the boards barely
touch the sanding belt.
8. Turn the table-height handwheel counter-
clockwise one complete turn to lower the
table approximately 0.020".
9. Lower the rear pressure rollers so that both
ends barely touch the gauge boards. The
rear pressure rollers are now set at 0.020"
below the sanding drum.
10. Turn the table-height handwheel counter-
clockwise again one complete turn, which
lowers the table an additional 0.020".
11. Lower the front pressure rollers so that
both ends just touch the boards. The front
pressure rollers are now set at 0.040"
below the sanding drum.
12. Tighten the adjustment jam nuts.
Belt
Tension
Knob
Pressure
Roller
Tension
Adjustments
and Jam Nuts
Figure 17. Belt and pressure roller adjustments.
ADJUSTMENTS