


-17-
OPERATIONS
W1736 Overarm Router
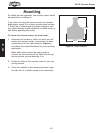
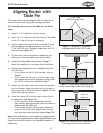
Figure 18. Example pattern template for
use with the table pin.
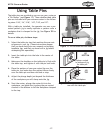
Using Table Pins
The table pins are provided so you can use your router as
a "Pin Router" (see
Figure 17). Three double-sided table
pins are included with your overarm router in the follow
-
ing sizes: 3/16", 1/4", 5/16", 3/8", 7/16", and 1/2".
With a table pin installed, the operator can use a pre-
routed pattern jig to easily replicate a pattern onto a
workpiece that is clamped to the jig. See
Figure 18 for
details.
To use a table pin, do these steps:
1. Select the table pin size that matches the pre-rout-
ed groove in your jig. (These instructions assume
that you have done your own research on building
template jigs, and that you have built a jig before
attempting this operation.)
2. Insert the table pin into the hole in the center of
the table.
3. Make sure the shoulder on the table pin is flush with
the table top, and tighten it with the pin lock knob.
4. Place the pattern of your pre-routed jig over the
table pin, and make sure the pattern moves freely
over the table pin and does not bind or stop.
5. Adjust the plunge depth just beyond the thickness
of the workpiece you will clamp onto the jig.
6. Start the router, plunge the router bit into the
workpiece, and guide the jig along the pre-routed
channel in the bottom to cut the workpiece clamped
to the top.
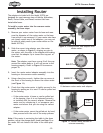
Figure 17. Pin location and lock knob.
Pin
Location
Pin Lock
Knob