


-21-
W1808/W1809/W1810 Cyclone Dust Collectors
SET UP
9. Lift the assembly upright and rotate it so the inlet/
outlet point where you want them for your shop
setup.
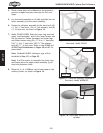
10. Lift the motor/blower housing assembly with a fork-
lift (or other means) and attach the intake cylinder
to the bottom of the housing, as shown
Figure 19,
using (4)
5
/16"-18 x
3
/4" hex bolts and (4)
5
/16" flat
washers.
Note: Because this part of the dust collector is not
accessible after assembly, consider using medium
strength (blue) Loctite
®
on the bolts that secure the
intake cylinder to the motor/blower housing assem
-
bly to ensure that the fasteners won't come loose
with vibration.
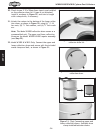
11. Place the remaining barrel gasket on top of the
intake barrel, then carefully lower the motor/blow
-
er housing assembly approximately 1" away from the
intake barrel.
12. Using two punches or Phillips screwdrivers, align the
mounting holes, as shown in
Figure 20, and lower
the motor housing onto the intake barrel.
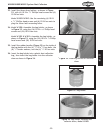
13. Attach the motor housing to the intake barrel, as
shown in
Figure 21, with (12)
5
/16"-18 x
3
/4" hex
bolts and (12)
5
/16" flat washers.
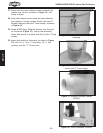
Note:
When installing the bolts above the intake
port, use duct tape (
Figure 22) on the bottom of
your wrench to hold the bolts in place.
Figure 19. Intake cylinder attached to the
bottom of motor housing.
Figure 20. Aligning the mounting holes.
Gasket
Figure 21. Securing intake barrel to
blower.
Figure 22. Using tape on a wrench to
install a bolt.