


Model W1828 (For Machines Mfg. Since 4/11)
-23-
SERVICE
SERVICE
This section covers the most common service adjustments
or procedures that may need to be made during the life
of your machine.
If you require additional machine service not included
in this section, please contact Woodstock International
Technical Support at (360) 734-3482 or send e-mail to:
tech-support@shopfox.biz.
General
MAKE SURE that your machine is
unplugged during all maintenance
procedures! If this warning is ignored,
serious personal injury may occur.
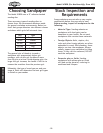
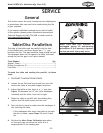
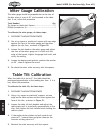
Table/Disc Parallelism
The edge of the table must be parallel with the face
of the sanding disc, and there should be a
1
⁄16'' gap
between the two. This gap should be large enough so that
the sandpaper does not rub against the table, but small
enough so that the gap is not a pinch hazard.
Tools Needed Qty
Wrench 10mm ...................................................1
Phillips Screwdriver #2 .........................................1
Fine Ruler ........................................................1
To make the table and sanding disc parallel, do these
steps:
1. DISCONNECT MACHINE FROM POWER!
2. Loosen the six flat head screws and hex nuts that
secure the table to the table support brackets.
3. Adjust the table so that there is a
1
⁄16'' gap (see
Figure 19) between the 12" disc (with sandpaper
installed) and the table, from left to right.
4. When the table is parallel with the sanding disc,
tighten the flat head screws and hex nuts.
5. Spin the disc by hand to make sure the sandpaper is
not touching the table.
— If the sandpaper does touch the table as you spin
the disc by hand, repeat Steps 2–5 until it does
not.
6. Perform the Miter Gauge Calibration procedure
on the next page to ensure the miter slot is
perpendicular to the sanding disc.
Figure 19. Table parallel with sanding
disc.
1
⁄16" Gap
Flat Head Screws