


-11-
CHARGING BATTERY PACK
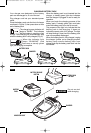
Your charger was designed so the battery
pack can be charged in, or out of the tool.
Plug charger cord into your standard power
o
utlet.
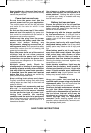
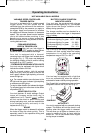
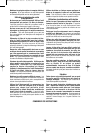
Place the battery pack onto the front of charger
as shown in Figure. 5, then press down at rear
end of battery pack.
The charger’s green indicator will
begin to “BLINK”. This indicates
that the battery is receiving a fast
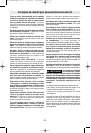
charge. Fast-charging will automatically stop
when the battery pack is fully charged (Fig. 6).
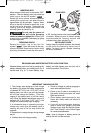
When the indicator light
stops “BLINKING” (and
becomes a steady green
light) fast charging is complete.
When the battery pack is not inserted into the
charger, a steady green light also indicates
that the charger is plugged in and is ready for
operation.
When you begin the charging process of the
battery pack, a steady green light could also
mean the battery pack is too hot or too cold.
The purpose of the light is to indicate that the
battery pack is fast-charging. It does not
indicate the exact point of full charge. The light
will stop blinking in less time if the battery pack
was not completely discharged.
When the battery pack is fully charged, unplug
the charger (unless you're charging another
battery pack) remove battery pack from
charger and slip the battery pack back into the
tool handle.
BATTERY
PACK
1
2
3
FIG. 5
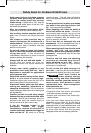
INDICATOR LIGHT
BATTERY PACK
IN TOOL
CHARGER
BATTERY RELEASE
BUTTON
FIG. 6
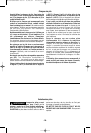
CHARGER
BATTERY PACK
Do not use tool
while charging.
!
WARNING
SM 1619X01949 06-07 6/29/07 12:20 PM Page 11