


You w
ill ext
end t
he lif
e of
your bit
s and do
neat
er
w
ork if you always put
t
he bit
in
c
o
n
ta
ct with
th
e
wo
rk
befo
re
pu
llin
g
th
e
t
ri
g
ge
r. D
u
ri
n
g
th
e
op
e
r a
ti
o
n
, h
o
ld
t
h
e
t
o
o
l
fi
rmly a
n
d
exert
l
i
gh
t, ste
ad
y p
re
ssure
. To
o
mu
ch p
re
s
s
u
re
a
t l
o
w sp
e
ed
wi
l
l sta
ll
the
to
o
l.
T
o
o
l
ittl
e
p
re
ssure
wil
l
ke
ep
th
e b
i
t fro
m
cutti
ng and cau
se excess friction by sliding
o
ve
r th
e su
rfa
ce
. Th
i
s ca
n
be
d
a
ma
g
i
n
g
to
both to
o
l and b
i
t.
$
!)&($
%#
T
h
e
trigg
e
r control
led
va
riable
spe
ed
feature
will eliminate the need for center punches in
hard materials. The variable speed trigger
allows you to slowly increase RPM. By using
a slow starting speed, you are able to keep
the bit from “wander ing”. You can increase
th
e speed as the bit
“bites” into the work by
squeezing the trigger.
$(!)&($%#
Va
ri
able speed drills will double as a power
screwdriver by using a screwdriver bit in the
drill mode. The technique is to start slowly,
incr
easing the speed as the screw runs
down. Set the screw snug ly by slowing to a
stop. Prior to driving screws, pilot and
cle
a
rance holes should be drilled.
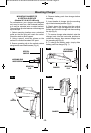
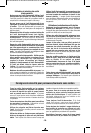
%&!!)&%$)%
This procedure shown in (Fig. 10) will enable
you to fasten ma terials together with your
Cordless Drill/Screwdriver without stripping,
splitting or separating the material.
First, clamp the pieces together and drill the
first hole 2/3 the diam eter of the screw. If the
"<1>-@5:3&5<?
-14-
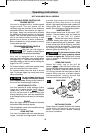
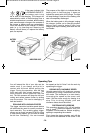
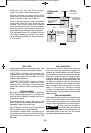
I
f the green indicator light
is “BLINKING RAPIDLY”,
the battery pack is too
hot or cold for fast-charging. The charger will
automatically switch to fast-charging once a
suitable temperature is reached, ;> the battery
pack cannot accept a charge or the contacts of
the charger or battery pack are contaminated.
Clean the contacts of the charger or battery
pack (e. g. by inserting and removing the
battery several times) or replace the battery
pack, as required.
T
he purpose of the light is to indicate that the
battery pack is fast-charging. It does not
indicate the exact point of full charge. The light
will stop blinking in less time if the battery pack
was not completely discharged.
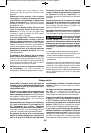
When the battery pack is fully charged, unplug
the charger (unless you're charging another
battery pack) remove battery pack from
charger and slip the battery pack back into the
tool handle.
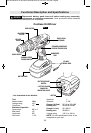
BATTERY
PACK
CHARGER
FIG. 9
INDICATOR LIGHT
SM 1619X04215 05-09:SM 1619X04215 05-09 5/21/09 3:09 PM Page 14