


14 ► CR27 User Manual
OPERATION
PREOPERATION PROCEDURES
PREPARATION FOR INITIAL USE
Each unit as shipped has no special unpacking or as-
sembly requirements prior to usage. Inspection to as-
sure the unit was not damaged in shipping and does not
contain packing debris is all that is required. After instal-
lation of a saw blade a unit may be put to use.
CHECK HYDRAULIC POWER SOURCE
1. Using a calibrated owmeter and pressure gauge,
check that the hydraulic power source develops a
ow of 5–7 gpm/19–26 lpm at 1000–2000 psi/70–
140 bar.
2. Make certain the hydraulic power source is equipped
with a relief valve set to open at 2100–2250 psi/145–
155 bar minimum.
3. Check that the dual spool valve is set to the hydrau-
lic system type (open-center (OC) or closed-center
(CC) operation).
CHECK TOOL
1. Make sure all tool accessories are correctly in-
stalled. Failure to install tool accessories properly
can result in damage to the tool or personal injury.
2. There should be no signs of leaks.
3. The tool should be clean, with all ttings and fasten-
ers tight.
CHECK TRIGGER MECHANISM
Check that the trigger operates smoothly and is free to
travel between the ON and OFF positions.
SETTING THE DUAL SPOOL FOR OC
(OPEN-CENTER) OR CC (CLOSED-
CENTER) OPERATION
SETTING FOR OPEN-CENTER (OC) OR
CLOSED-CENTER (CC) OPERATION
1. To set the tool for open-center (OC) system opera-
tion turn the selector screw located in the top of the
valve spool fully out (counter-clockwise) until it hits
the stop.
2. To set the tool for closed-center (CC) system opera-
tion turn the selector screw located in the top of the
valve spool fully in (clockwise) until it bottoms.
TO DISABLE DUAL SPOOL OPERATION
AND CONVERT TO OPEN-CENTER ONLY
OPERATION
1. Turn the selector screw located in the top of the
valve spool fully out (counter-clockwise) until it hits
the stop.
2. Insert the small plug from the kit (furnished with the
tool) into the hole located in the top of the selector
screw. Tap the plug down using a small punch and
hammer. DO NOT USE ANY ADHESIVES.
TO DISABLE DUAL SPOOL OPERATION
AND CONVERT TO CLOSED-CENTER
ONLY OPERATION
1. Turn the selector screw located in the top of the
valve spool fully in (clockwise) until it bottoms.
2. Insert the small plug from the kit (furnished with the
tool) into the hole located in the top of the selector
screw. Tap the plug down using a small punch and
hammer. DO NOT USE ANY ADHESIVES.
BLADE INSTALLATION
1. Handle the saw blade with care. The cutting edges
are sharp and careless handling could result in in-
jury.
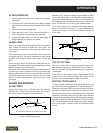
2. Install the blade over the motor shaft and onto the
xed collar so that the points of the teeth on the
blade are facing clockwise as viewed from the front
of the motor (see Figure 2).
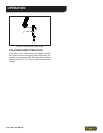
3. Install the moveable collar followed by the collet nut
(see Figure 3). Tighten the collet nut hard (not wrist
tight).
4. Install the locking nut with internal taper facing to-
ward the collet nut and tighten it hard against the
collet nut.
5. As a nal tightening procedure, with a wrench on
each of the nuts, tighten the locking nut one half
wrench at further.
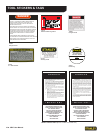
IMPORTANT
This tool is furnished with a ON/OFF spool
commonly referred to as a “dual spool” which permits
adjustment so the tool may be operated on either an
open-center (OC) or closed-center (CC) hydraulic
system. The dual spool is normally set to the OC
position at time of manufacture. The dual spool can
also be disabled so that the tool may be set to OC
only operation. For more details, please refer to the
following instructions.