


CR27 User Manual ◄ 17
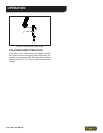
OPERATION
AFTER OPERATION
1. Wipe the saw thoroughly with a clean dry or slightly
oiled cloth.
2. Clean tree pitch and residue from the blade. Handle
the blade with care to avoid getting cut by the sharp
teeth.
3. Check all fasteners for tightness.
4. When the saw is not in use, store horizontally in a
clean, dry space and protected from damage.
5. Protect the blade teeth and keep the teeth sharp. A
sharp blade will cut cleaner and faster.
BLADE CARE
Every day visually check the blade for cracks and warp-
age. Cracks will lead to a break and “out of at” will
cause excessive vibration. Make sure the spindle lock-
nut is tight.
When sharpening, never use a at le which may leave
a square corner in the gullet. Because of high speed
vibration, this becomes a point from which a crack will
start.
Do not let gum, sap or dirt build up underneath the cut-
ting edges. This adds undue friction and reduces cutting
efciency due to loss of clearance.
Inspection of the cutting teeth should be made often dur-
ing each day’s use. It is faster to touch up the teeth with
a few strokes of the le than to allow the teeth to get dull.
Dull teeth cause loss of cutting capacity and too much
friction. A sharp spare blade is a good back-up in case
of trouble.
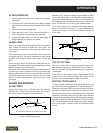
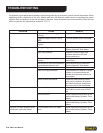
BLADE SHARPENING
BLADE TEETH
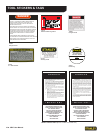
Using a le holder with a 7/16 inch round le (Stanley
Part Number 11299), place the le holder at on top of
the cutter with the le against the cutter tooth.
CUTTER
FILE HOLDER
FILE
CUTTER TOOTH
PLACE FILE HOLDER FLAT ON TOP OF CUTTER
Figure 6. Blade Sharpening
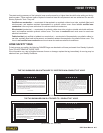
Maintain a 20° angle and always le outwards on each
right or left cutter tooth. File only with a slight pressure
against the cutter tooth (not on top of the cutter) during
the forward stroke. Release pressure as you pull the le
back. The le will only cut during the forward stroke.
While ling, always try to keep the le holder perpen-
dicular to the side of the blade. Try not to move the le
holder up or down or move the le holder to the setting
of the tooth.
Figure 7. Filing Angle
TOP OF CUTTERS
The top of each cutter is factory ground to ensure the
best cutting performance. Normally, the tops of the cut-
ters will not require ling unless the edge is badly worn
or damaged.
If the top of a cutter requires ling, use a smooth at le
to give the cutter its original shape. After ling, ensure
that all cutters have the same length and prole.
SETTING TOOTH ANGLE
A sharp outside corner and an exact angle setting will
give maximum cutting performance. Special setting tool
(Stanley part number 34653) is required to verify or prop-
erly set the angle of each cutter tooth at .040 inch/1 mm.
Match one of the grooves in the setting tool to the blade
thickness. Place the setting tool over the cutter near the
cutter tooth and bend the tooth until the angle on the set-
ting tool touches the side of the blade. DO NOT OVER
SET. Over-setting will cause rough cutting and vibration
which may result in stress cracks and eventual blade
failure.