


STUDER INNOTEC
XP-COMPACT
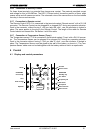
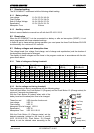
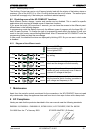
table 6.3.1.
If desired, repeat the operation with any other parameter (voltage or time) to be changed.
If during 10 seconds no buttons are pressed, the selected values are automatically stored and the
XP-COMPACT switches back in to the normal operating status.
The voltage levels and times changed through programming are only first active with the next
charge cycle!
The voltage levels which are not suitable can greatly reduce the battery life or could even destroy
it! Therefore check beforehand with your battery supplier.
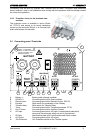
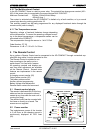
6.4 Program the auxiliary contact
With the Push Button 21 „AUXILARY CONTACT“ the contact can be manually switched on or off
independent of programming and the operating situation. The LED 5 “Contact active” show the
state of the contact. The drawing up the screw terminal “AUX CONTACT” is the inactive position
mode, LED 5 “Contact active” off.
The switching on and off of this contact can be freely programmed for every operating situation of
the XP-COMPACT witch situation is indicated with a LED. There is no limitation to its application
and it is left to your wishes and desires as to where and how you would like to use it.
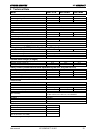
6.4.1 Principle
The Auxiliary Contact can be basically programmed for any operating situation of the XP-
COMPACT which is indicated with a LED. The programming is possible for one or more operating
situations. If the contact is programmed for many situations, it is activated as soon as the XP-
COMPACT finds itself in any one of the programmed situations. This means that the way of work-
ings of the contact meets that of the logic OR–Function.
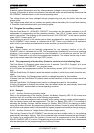
6.4.2 The programming of the Auxiliary Contact is carried out in the following Steps
The Push Button 21 (Program) press down for min. 2 seconds. The LED 4 „Program“ is lit as an
indication, that the XP-COMPACT is in program mode.
A lit LED shows the programmed condition for the auxiliary contact. (LED 10/11/12/13 factory set-
ting)
With the Push Button 20 (select), select the desired condition in which the contact should be acti-
vated.
With the Push Button 19 (Change status) confirm or change the status for this condition.
If desired, with the Push Button 20 (select) select another condition in which the contact should be
activated.
With the Push Button 19 (Change status) confirm or change the status for this condition.
If during 10 seconds no buttons are pushed, then the settled values are automatically stored and
the XP-COMPACT switches back to normal operating condition.
6.4.3 Example
6.4.3.1 Auxiliary Contact as generator starter
When in the programming of the Auxiliary Contact, the Battery Capacity (LED 15-18) is used as a
condition, then you must take note of the following requirements.
If you have to start an emergency back-up supply with a battery having a certain residual capacity,
then two battery levels must be programmed. The first (i.e. Battery 25% LED 17) for starting or
activating the Auxiliary Contact, and the second (i.e. Battery 100% LED15) for stopping or deacti-
vating the Auxiliary Contact. By programming like this the Auxiliary Contact is active with the lowest
set condition and release when it has reached the highest programmed condition through charging.
6.4.3.2 Auxiliary Contact as Twilight Switch (With solar charger option)
The Auxiliary Contact of the XP-COMPACT can also be used as a twilight switch, i.e. for operating
automatically the exterior lighting. With it the connected solar modules measure the light intensity.
To function as a twilight-switch the Auxiliary Contact must be programmed so that the condition
SOLAR CHARGE (LED 3) is active. Programming must be carried out in steps and in accordance
with the description for the programming of the Auxiliary Contact.
User manual XP-COMPACT V2.0 E
19