


GB
3
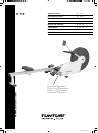
OWNER'S MANUAL • R710
OWNER'S MANUAL R710
INFORMATION AND
WARNINGS
Please read this owner’s manual through carefully
before assembling, using and servicing the workout
equipment! Follow the instructions described in this
manual carefully.
The equipment is covered by the Tunturi
warranty. In home use, the warranty period is 24
months, in light commercial use 12 months. Light
commercial warranty applies to the product when
used in an institutional or corporate environment
where the operational time does not exceed an
average of 5 hours use per day. The warranty does
not cover damage due to shipping or negligence of
assembly, use, adjustment or maintenance instructions
described in this manual. Changes or modifi cations
not expressly approved by Tunturi Oy Ltd will void
the user’s authority to operate the equipment.
NOTE ABOUT YOUR HEALTH
•
Before you start any training, consult a physician to
check your state of health.
•
If you experience nausea, dizziness or other
abnormal symptoms while exercising, stop your
workout at once and consult a physician.
•
To avoid muscular pain and strain, begin each
workout by warming up and end it by cooling down.
Don’t forget to stretch at the end of the workout.
NOTE ABOUT THE EXERCISING
ENVIRONMENT
•
The device is not to be used outdoors.
•
Place the rowing machine on a fi rm, level and
protected surface to optimaze training comfort and to
avoid any damages to the fl oor beneath the equipment.
•
Make sure that the exercising environment has
adequate ventilation. To avoid catching cold, do not
exercise in a draughty place.
•
In training, the equipment tolerates an environment
measuring +10°C to +35°C. The equipment can
be stored in temperatures ranging between -15°C
and +40°C. Air humidity in the training or storage
environment must never exceed 90 %.
NOTE ABOUT USING THE EQUIPMENT
•
If children are allowed to use the device, they
should be supervised and taught to use the rowing
machine properly, keeping in mind the child’s
physical and mental development and their
personality.
•
Before you start using the rowing machine, make
sure that it functions correctly in every way. Do not
use a faulty device.
•
Only one person may use the device at a time.
•
Wear appropriate clothing and shoes when
exercising.
•
Do not attempt any servicing or adjustment other
than those described in this manual. The given
instructions must be followed carefully.
•
The device must not be used by persons weighing
over 135 kg.
ASSEMBLY
Before assembling the device, make sure the
following parts are present:
1. Meter
2. Pedals (2)
3. Pedal shaft
4. Pedal mounting bracket
5. Drawbar
6. Seat rail
7. Seat rail end cap
8. Seat carriage stops (2)
9. Seat assembly
10. Main frame
11. Front stand tube
12. Rear stand tube
13. Stand tube and caps (4)
14. Assembly kit (contents marked with *
in the spare part list)
In case of any problems, contact always your local
Tunturi distributor. The spare part list is at the back of
the manual. Assemble the device as follows:
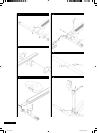
FRONT SUPPORT FIG. 1
Push the front support through the mounting piece
below the front frame, and attach the front support to
the mounting piece with two small 5/16” x 1/2” Allen
screws. Press the plastic cover pads on to the ends of
the support.
FOOTRESTS FIG. 2
Push the footrest axle through the tube in the
mounting piece and position the footrests on the axle.
The footrests are marked
LEFT and RIGHT. Place a 3/
8” washer and locking nut at both ends of the axle and
tighten the nuts with a 15 mm wrench. Turn the rail so
that the bottom faces upward. Attach the footrests to
the rail with four 5/16” x 1” washers, and long Allen
screws. Attach the rubber front stopper of the seat
under the rail with a washer and 3/16” Phillips screw.
SEAT AND REAR SUPPORT FIG. 3
Push the seat on to the rail. Fit the rear support in
place under the rail and position a washer inside
the rail. Then attach the rear support to the rear end
of the rail with four 5/16” x 1” washers, and long
Allen screws. Use a 12 mm Allen key to tighten the
screws. Push the plastic cover on to the rear end of
the rail, and a plastic cover pad on each end of the
R710_2004 3 10.6.2004, 14:47:55