


Specifications
Maximum air input pressure ............145 PSI (1 MPa)
Maximum working pressure.............3600 PSI (25 MPa)
Material quantity .............................according to tip
Air connector ...................................NPSM 1/4"
Material connector ...........................NPSM 1/4"
Filter.................................................100 mesh
Length..............................................8.5” (216 mm)
Height...............................................9.8” (250 mm)
Weight..............................................1 lb. (420 g)
Introduction
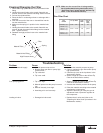
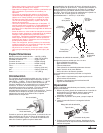
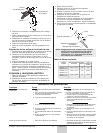
In the air assisted/airless spraying process, the spraying
material is atomized under pressure at 400 – 2800 PSI (3 – 19
MPa). The atomizing air at 7 – 32 PSI (0 – 0.22 MPa)
produces a soft spray jet that eliminates problems of overlaps
in the boundary zone. The soft spray jet prevents the spraying
material from rebounding to the gun. The form air reduces or
increases the spray jet width, depending on the adjustment of
the air adjustment knob. Due to the cleaning-friendly design of
the tip and the lack of air holes near the material outlet, the tip
is virtually self-cleaning.
When the trigger of the gun is pulled, the air valve opens
allowing atomizing and fan jet air to flow up to the tip. The
material valve opens only when the trigger is pulled to its
fullest extent.
The amount of air for the spray jet width is adjusted using the
air adjustment knob. The spray gun is locked off by turning
the gun lock nut clockwise (when looking from the back of the
gun) until it stops. This closes the material valve in the gun.
The air input should be adjusted at the source to
approximately 0 – 32 PSI (0 – 0.22 MPa).
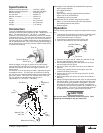
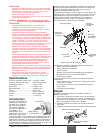
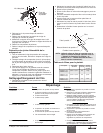
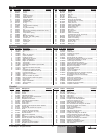
Gun Body
Tip
Guard
Trigger
Material Tube
and Filter
Material Inlet Fitting
Air
Adjustment
Knob
Air
Inlet
Fitting
Gun
Lock
Nut
Atomized Material
Atomizing Air
Form Air
Advantages of the adjustable air assisted/airless process:
• high coverage capacity
• low fogging tendency
• fine finish
• high viscosity materials applied without problems
• higher tool-life of the Brilliant-tip
• adjustability of spray jet width
Materials that can be sprayed using this gun include:
•Water, oil, and solvent based primers and topcoats
• 2K finishing enamels and primers
• Release agents
Operation
Use the following procedure to setup and spray with the spray
gun.
1. Lock the gun by turning the gun lock nut clockwise (when
looking from the back of the gun) until it stops. This
closes the material valve in the gun.
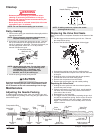
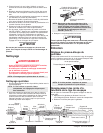
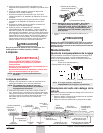
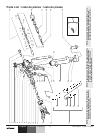
2. Unscrew the tip guard and remove the air cap.
3. Insert the AirCoat tip into the inlet seal sleeve.
4. Place the air cap on the tip. Make sure that the air cap
pins are aligned with the slots on the tip
5. Set the desired spraying plane with the horns of the air
cap and replace the tip guard.
6. Set up the spray unit (refer to the spray unit’s Owner’s
Manual).
7. Connect the material hose from the spray unit to the
material inlet fitting on the gun.
8. Connect the air hose from the spray unit to the air inlet
fitting on the gun.
9. Start up the spray unit (refer to the spray unit’s Owner’s
Manual).
10. Adjust the material pressure at the pump to approximately
400 PSI (3 MPa). Pull the trigger and increase the pump
pressure until the spray pattern is acceptable. Open the
atomizing air at the external air regulator and adjust the
air pressure to the best spray pattern (to a maximum of 32
PSI (0.22 MPa)) . The form air may be adjusted using the
air adjustment knob to the required spray jet width.
Do not turn the air adjustment knob using pliers. Over-
tightening and damage to the gun may occur.
CAUTION
Inlet Seal Sleeve
Air Cap
Tip
Tip Guard
©Wagner. All rights reserved. 3
English
R