


10
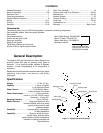
SET-UP
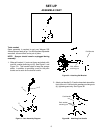
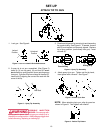
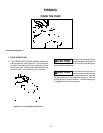
1. Lock gun. See Figure 4.
Figure 4 - Gun in Locked & Unlocked Position
ATTACH TIP TO GUN
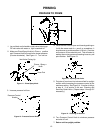
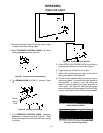
2. If spray tip is not pre- assembled, (See Figure 5)
insert tip (1) into tip guard, (2) and turn 90° coun-
terclockwise to spray position (arrow pointing away
from gun). Cylinder of tip forms a stop for the seal (3).
Insert seal (3) aligning the curve of the seal with the
curve of the tip.
Figure 5 – Spray Tip Assembly
4
1
Red Seal
3
2
WARNING
out tip guard in place. Never trigger gun unless tip is in
the spray or unclog position. Always engage trigger lock
before removing, replacing or cleaning tip.
POSSIBLE INJECTION
HAZARD. Do not spray with-
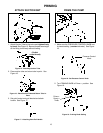
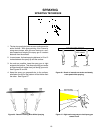
3. Check seal alignment by removing tip and inspecting
tip guard visually, See Figure 6. If needed, remove
seal (3) and replace until properly aligned. Replace
tip to spray position, (arrow away from gun). Insert
red seal (4).
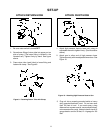
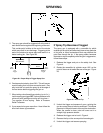
Figure 8 - Vertical Tip Pattern
Correct Way
Wrong Way
Figure 6 - Spray Tip Assembly
4. Attach spray tip to gun. Tighten nut first by hand,
then tighten with a wrench. See Figure 7.
Figure 7- Attach Tip to Gun
NOTE: When attaching tip to gun, align tip guard as
shown in Figure 8. Then tighten with wrench.
Unlocked
Position
Locked
Position