


Maintenance
Follow these procedures when encountering problems
indicated in the troubleshooting section.
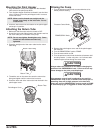
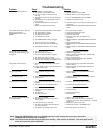
Removing and Cleaning the Inlet Valves
1. Be certain that the sprayer is off.
2. Remove the inlet valve assembly using a 27 millimeter
socket or box end wrench.
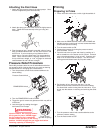
3. Test movement of the valve by pushing on it from the
open end of the valve housing with a screwdriver or the
eraser end of a pencil. It should move about 1/16 of an
inch. If it does not move, it should be cleaned or
replaced.
4. Thoroughly clean the valve assembly with water or the
appropriate solvent. Use a small brush.
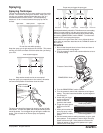
5. If you have properly cleaned the valve and water drips out
of the bottom, the valve is worn and needs to be replaced.
A
properly seated valve filled with water and held vertically
will not drip.
6. Install a new or cleaned valve in the pump block and then
fill the valve with light oil or solvent.
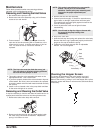
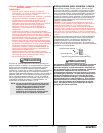
Removing and Cleaning the Outlet Valve
It may be necessary to remove and clean the outlet valve or to
replace parts inside the valve worn out through normal use.
1. Remove the outlet valve body with a wrench.
2.
Remove and clean the ball stop and small spring inside
the valve using a wire hook or tweezers. Replace the
spring if it is broken or worn.
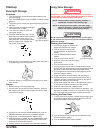
NOTE: The inlet valve must be oiled after every job.
This will reduce or eliminate priming problems
the next time the sprayer is used.
10 © SprayTECH. All rights reserved.
3. Remove the seat and ball assembly.
4. Clean all parts thoroughly. If the ball or seat show any
sign of wear or damage, replace them with new parts.
This carbide ball must seal tightly against its seat for the
valve to function properly.
5. Cover all parts with a thin coat of light oil before
reassembling.
6. Drop in the valve ball.
7. Insert the ball stop and spring and replace the valve body.
Be sure that the o-ring is positioned properly and that the
tongue on the cap fits inside the spring.
8. Tighten the valve body securely with an adjustable
wrench. Do not over-tighten.
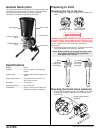
Cleaning the Hopper Screen
The screen at the bottom of the paint hopper may need
cleaning periodically. Check it every time you add paint.
Remove the screen by pulling it out of the hopper with a pliers.
Clean the screen with water or solvent and a soft-bristle brush,
if necessary.
Valve Body
O-ring
Seal
Seat
Ball
Spring
Ball Stop
NOTE: You will need to align the ridge on the seat with
the groove in the pump housing when
reassembling.
N
OTE: This spring is manufactured to a very specific
tension. Do not put in an unauthorized
substitute. See the paint pump assembly parts
diagram for the proper replacement part
number.