


English
4
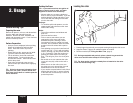
2. Usage
General Rolling Tips:
Preparing the room
Remove all pictures, mirrors, and decorations
from the walls and draperies from the
windows. Remove all nails, hardware and
switch and receptacle covers. Cover furniture
and oor with drop cloths.
Surface Preparation
• Always remove wallpaper before painting.
Wash off old adhesive and rinse with
water. Allow the walls to dry before
painting.
• Wash and rinse dirt, grease and oil build-
up off the walls with soap and water.
• Fill all nail holes, joints and cracks with
patching paste. Let dry and sand the
surface until smooth. Clean sanded area
with a damp cloth.
• Spot prime all patched areas and any
marker and/or pen marks before applying
rst coat.
TIP: Write the important information from
your paint can (color, formula, brand and
paint type) on the back of a switch plate for
future reference.
Painting the Room
TIP: If you need more than one gallon of
paint to do the room’s walls, mix them
together to ensure color uniformity.
• Always make sure to open a window or
door to ensure proper ventilation. If you are
painting both the ceiling and walls in your
room, start with the ceiling rst and then
move to the walls.
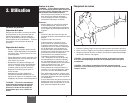
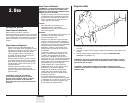
Ceilings:
• To minimize spills and spatters, use the
spatter guard and paint across the short
width of the ceiling.
Walls:
• Tape off around base and window and
door trim.
• Paint one wall at a time.
• Pick an area to start where you can
saturate the roller cover and evenly
distribute the paint. Working in three-
foot sections, begin by cutting-in around
windows, doors, cabinets, base and other
breaks in the wall surface with a pad or
brush.
• Start painting at one end of a wall and roll
out the letter “W”. Fill it in with crosswise
strokes, working your way across the wall
in 3’ x 3’ sections. Finish the sections by
painting one solid swipe from ceiling to
oor. This will give you a nice even paint
nish.
• Be careful not to over-saturate the roller
cover as it may drip, slide on the wall or
spatter.
• Make sure to run the roller cover over
the areas you cut-in around the trim and
baseboards to even out the texture.
• If you need to stop and take a break; nish
painting the entire wall, or stop at a break
in the wall such as a doorway or corner to
prevent lap marks.
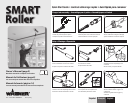
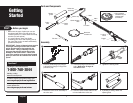
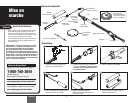
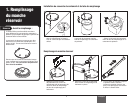
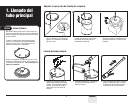
Loading the roller
1. Push plunger forward until you see paint coming through the roller cover.
2. Squeeze Power Trigger® for additional paint as needed.
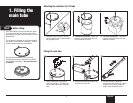
3. Rell as needed (see Filling the Main Tube, page 3).
TIP: During extended break periods, place a plastic bag around the
roller cover and ll valve to keep it from drying out.
TIP: For best results, maintain a steady ow of material to the roller.
cover and avoid rolling it dry.
1