


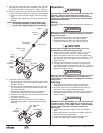
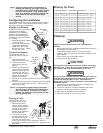

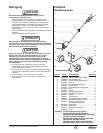

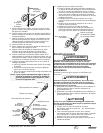

15. Insert the gun pole knob from the opposite side of the gun
pole support, through the star lock washers, and into the
gun mount assembly on the gun pole. Tighten securely.
16. Install an airless spray gun into the gun mount assembly.
a. Place the handle of the gun into the gun mount assembly.
b. Position the gun so that the trigger rests on the trigger
lever.
c. Tighten the gun clamp knob securely to hold the gun in
position.
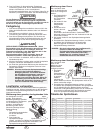
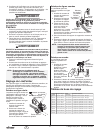
17. Install and position the gun stop.
a. Position the gun at the desired minimum height on the
gun pole support. Tighten the gun pole knob to secure
the gun in position.
b. Insert the gun stop thumbscrew through the slot in the
gun pole support so that the thumbscrew is below the
gun mount assembly.
c. Slide the gun stop thumbscrew up in the slot until it
contacts the bottom of the gun mount assembly.
d. Thread the gun stop nut onto the gun stop thumbscrew
and tighten securely.
e. Loosen the gun pole knob.
f. Adjust the handle so that the gun is at the desired
angle/operating position. Tighten the gun pole knob
securely.
Thumbscrew
Gun Pole
Knob
Nut
Gun
Mount
Assembly
Hose Clip
Gun Pole
Knob
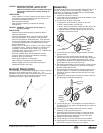
Star Lock
Washers
Top Pole
Piece
Trigger
Bottom Pole
Piece
Gun
Mount
Assembly
Trigger
Lever
Gun
Clamp
Knob
Pole Clamp
Assembly
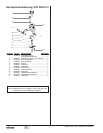
NOTE: Adjustment of the gun mount assembly may
be required depending on which airless spray
gun is used. Adjust using a 9/64” hex wrench.
4©Wagner Spray Tech. All rights reserved.
Operation
This equipment produces a fluid stream at extremely high
pressure. Read and understand the warnings in the
Safety Precautions section at the front of this manual as
well as the airless sprayer and spray gun manuals before
operating this equipment.
Setup
Perform the following procedure to prepare the LinePainter for
operation.
Make sure all airless hoses and spray guns are electrically
grounded and rated at or above the maximum operating
range of the sprayer.
1. Follow the setup procedure and safety precautions
outlined in the airless sprayer’s owner’s manual.
2. Follow the setup procedure and safety precautions
outlined in the airless spray gun’s owner’s manual.
Always keep the trigger lock on the spray gun in the
locked position while preparing the system.
3. Using a wrench, attach a minimum of 50’ of 1/4” nylon
airless spray hose to the sprayer. Tighten securely.
4. Attach the opposite end of the hose to the airless spray
gun in the gun mount assembly on the LinePainter. Using
two wrenches (one on the gun and one on the hose),
tighten securely.
5. Clip the airless hose into the hose clip on the gun pole.
6. Configure the LinePainter for the type of striping to be
performed (straight line, curved line, curb, etc...). Refer to
the “Configuring the LinePainter” section in this manual for
different LinePainter set ups.
Make sure the airless sprayer is off, the trigger lock on the
spray gun is in the locked position, and all pressure is
relieved from the system before changing the LinePainter
configuration.
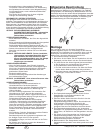
Painting
1. Position the airless sprayer so that it is close to the
striping path but will not interfere during application.
2. Coil the hose so that it will unwind without catching on
itself or any other obstacle during application.
3. Start up the airless sprayer. Follow the startup procedure
and safety precautions outlined in the airless sprayer’s
owner’s manual.
POSSIBLE INJECTION HAZARD. Do not spray without the
tip guard in place. Never trigger the gun unless the tip is
in either the spray or the unclog position. Always engage
the gun trigger lock before removing, replacing, or
cleaning tip.
4. Position the LinePainter slightly in front of the striping
path.
5. Start walking with the LinePainter and trigger the gun at
the beginning of the striping path.
6. At the end of striping path, release the trigger and
continue walking a short distance, if possible.
WARNING
WARNING
CAUTION
WARNING
WARNING
R
GB