


6
Flexio 867
AUS
•
Before working on the spray gun remove the power plug from the socket.
•
Cover areas that are not to be sprayed. When working keep in mind that wind, for example,
may transport paint mist over great distances and cause damage.
•
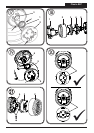
The units may only be used with a functional valve. If paints rises in the ventilating hose
(Fig. 1, item 19) do not operate the unit further! Dismantle and clean the ventilating
hose, valve and diaphragm and replace the diaphragm if necessary.
•
Do not lay the spray gun.
•
The device is equipped with a thermal release which disconnects the device in case of
overheating. In this case, turn o the device, remove the plug and let the device cool
down for at least 1/2 hour. Eliminate the cause of heating, e.g. bent hose, soiled air lter,
slots for air intake covered.
With original WAGNER accessories and spare parts, you have the guarantee that all
safety regulations are fullled.
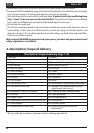
4. Description/ Scope of delivery
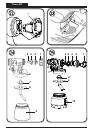
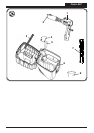
Description/ Scope of delivery (Figs. 1+2)
1) Air cap 2) Nozzle
3) Union nut 4) Perfect Spray spray attachment
5) Trigger 6) Material volume regulation
7) Gun handle 8) Air volume control
9) ON/OFF switch 10) Air hose
11) Carry handle 12) Cover
13) Bottom section 14) Main switch
15) Closure 16) Container
17) Gun holder 18) Valve
19) Ventilating hose 20) WallPerfect I-Spray spray attachment
21) Air hose connection 22) Fastener for radiator/detail spray
attachment (accessory)
23) Deposition tray for hardware 24) Cover of air lter compartment
25) Air lter 26) Cable grommet
27) Power cable 28) Air hose retainer
29) Deposition tray for spray attachments 30) Stirring rod
31) Feed hopper 32) Practice poster
33) Replacement nozzle seal * 34) Lubricating grease (without
illustration)*
* This is inside the container: remove it before starting operations!