11
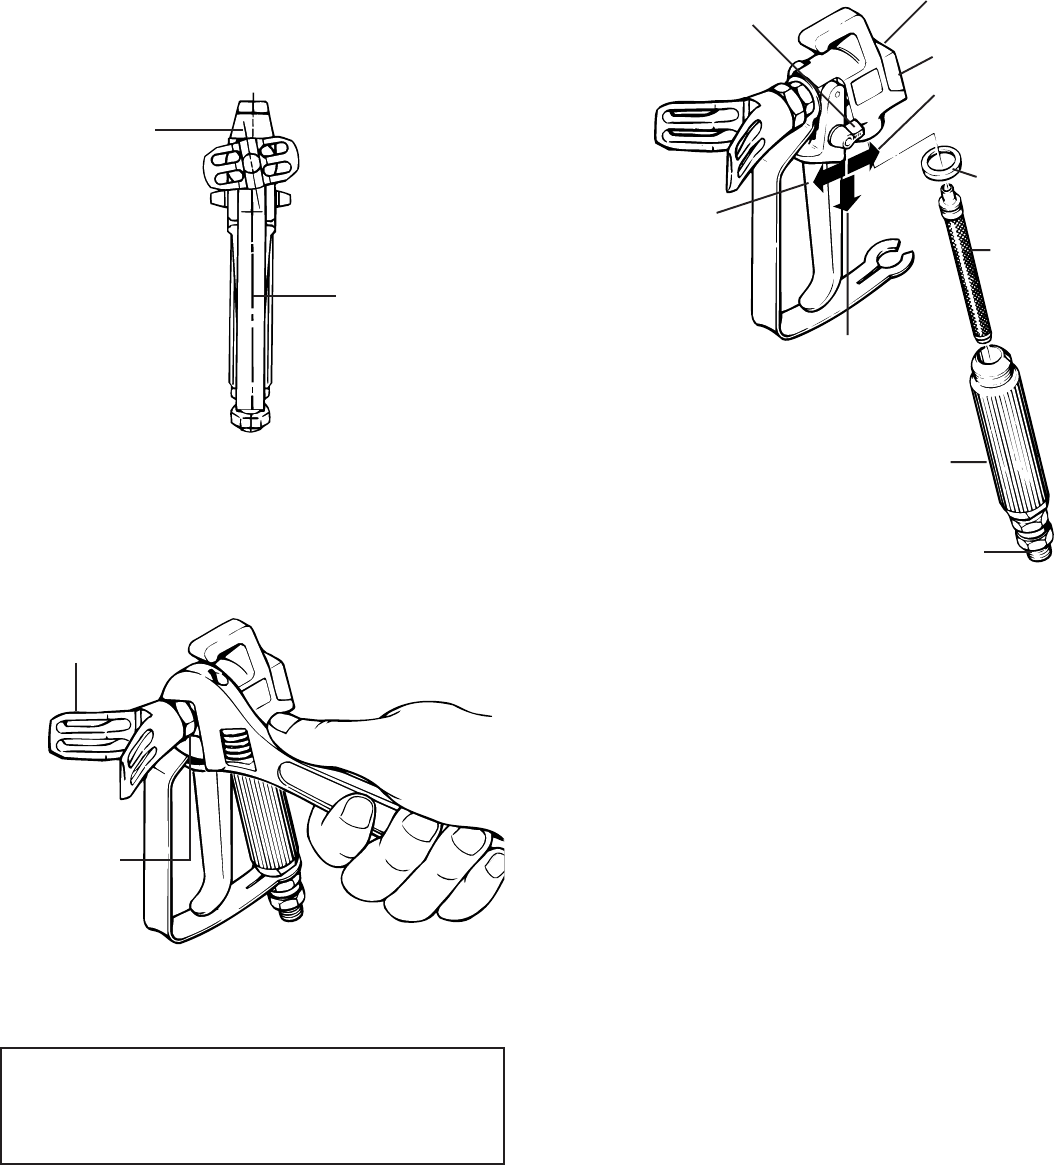
4. Tighten tip nut. The tip guard should now be in the proper
position. See Figure 5.
Figure 4.- Spray Gun Tip Guard Postion Before
Tightening.
3. Loosen the tip nut slightly. Turn the tip guard about
1/16 turn counterclockwise from desired spray angle.
See Figure 4.
Figure 6.-Spray Gun Filter Assembly and Trigger Safety
Lever position.
6. Test the trigger tension by unlocking the trigger safety
lever and pulling back trigger. To increase tension, turn
tension nut (see Figure 6) clockwise. To decrease
trigger tension, turn tension nut counterclockwise. After
adjusting trigger tension, lock trigger safety lock in
locked off position as shown in Figure 6.
7. Connect the paint hose to the spray gun. This connec-
tion should be tight.
PAINT STRAINING AND
THINNING
When a container of paint is exposed to the air for a period
of time, “skin” may form on top. This “skin” should be
removed. If necessary, the paint should be strained
through a strainer.
Under normal conditions, paints used with this airless
sprayer do not have to be thinned. However, it is possible
that you may use paint that is too thick to be sprayed. In this
case you will have to thin the paint.
When thinning paint to spraying consistency (viscosity),
use the right thinner — water for latex paints, mineral spirits
for oil base paints (or, see the instructions on the paint
container for proper thinner).
TENSION NUT
SEALING
WASHER
FILTER
HANDLE
UNLOCKED
(SPRAY AS DESIRED)
TRIGGER SAFETY
LEVER
SPRAY GUN
HOUSING
CONNECT SPRAY GUN HOSE
LOCKED OFF
(WILL NOT
SPRAY)
LOCKED ON
(CLEANING ONLY)
Figure 5.-Tightening Spray Gun Tip.
TIP NUT
TIP GUARD
TIGHTEN WITH
WRENCH FROM
THIS POINT
DESIRED SPRAY
ANGLE
NOTE
Do not try to change the angle of the tip guard
unless the tip nut has been loosened.
5. Put the spray gun filter on the gun as shown in Figure 6.
First remove the handle from the spray gun housing.
Stick the small end of the filter firmly in the spray gun
housing. Then screw the handle back on. See Page 26
for Optional Filters.
