


12
OPERATION
START UP PROCEDURE
SPRAY PAINTING
You can learn to spray paint as easy as you can learn to
paint with a brush or roller. You can get a professional
looking job in a safe manner by following the spray painting
tips below.
1. Heed all WARNINGS and CAUTIONS that are listed on
pages 2 thru 6 at the front of this manual. Take time out
now to reread them.
11. MAKE SURE PRESSURE IS REDUCED BY TURN-
ING THE PRESSURE CONTROL KNOB COUNTER
CLOCKWlSE.
12. TURN PRIMING KNOB TO (SPRAY) POSITION
— will appear in the knob window.
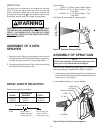
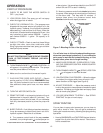
13. UNLOCK SPRAY GUN TRIGGER — When the trigger
is unlocked, the trigger safety lever will point in the
same direction as the trigger (see Figure 6).
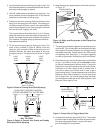
14. ADJUST PRESSURE — Adjust the pressure control
knob on the sprayer to lowest pressure needed for good
operation. Pull spray gun trigger back and spray a test
area to check spray pattern.
15. YOU ARE NOW READY TO SPRAY — See “SPRAY
PAINTING” for tips on how to spray.
You will also have to follow the above bleeding proce-
dure when you change hydraulic oil, if you remove the
paint pump or work on the hydraulic housing, or if the
sprayer loses prime due to rough handling.
1. CHECK TO BE SURE THE MOTOR SWITCH IS
OFF— play it safe.
2. LOCK SPRAY GUN—The spray gun will not spray
when the trigger lock is locked.
3. CHECK THE HYDRAULIC OIL— The sprayerer was
shipped with the proper amount of hydraulic oil in the
hydraulic pump. However, the oil should be checked
before starting. Look at oil level in oil fill port. When the
unit is level, oil level should be at bottom of fill port. Use
only hydraulaic oil part number 0088009 - 1 quart or
part number 0088010 - 1 gallon. Oil capacity is 19
ounces.
4. CHECK FITTINGS—Check to see that these fittings
are tight: inlet valve, return tube, outlet valve, outlet
fitting, high pressure airless hose, spray gun and allen
head paint pump screws.
NOTE
DO NOT TIGHTEN PAINT PUMP SCREWS TO MORE
THAN 15 FOOT-POUNDS TORQUE (180 INCH-
POUNDS)
5. TURN PRIMING KNOB TO (PRIME) POSITION— A
will appear in the priming knob window. The sprayer
must be primed before it will spray.
6. Make sure the suction tube is immersed in paint.
7. PLUG ELECTRIC CORD INTO OUTLET— Electric
service must be 115 VAC, 60 Hz. REMEMBER: More
than 100 feet of extension cord is not recommended.
Use additional airless paint hose, not more electric
cord.
8. TURN THE MOTOR SWITCH ON.
9. PRIME THE PUMP—Let the paint circulate until no air
bubbles show in the paint (aboutt 2-3 minutes). Turn
the pressure control valve at least 1/2 turn clockwise
from fully decreased postion to prime the pump with
paint.
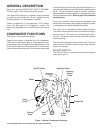
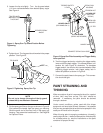
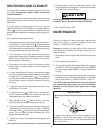
10. BLEED THE AIR—If unit fails to prime when started up,
it may be necessary to bleed (vent) the air out of the
hydraulic system. Bleed the air as follows:
A. Turn pressure control knob all the way counter-
clockwise, turn priming knob to , and let sprayer run
a few minutes. It is sometimes helpful to turn ON-OFF
switch ON and OFF to assit in bleeding.
B. Now turn pressure control knob clockwise to prime
the pump. When sprayer is primed, paint will come out
of the return tube. This may take 2-3 minutes. If
sprayer does prime, turn pressure control knob
counterclockwise and repeat procedure.
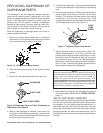
PRESSURE CONTROL
VALVE KNOB
Figure 7.-Bleeding Air Out of the Sprayer.
© 1995 WAGNER SPRAY TECH CORPORATION. ALL RIGHTS RESERVED.