


10
PP119
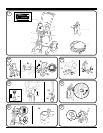
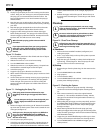
Figure 11 - Spraying Technique
A) The key to a good paint job is an even coating over the entire
surface. Keep your arm moving at a constant speed and keep
the spray gun at a constant distance from the surface. The
best spraying distance is 25 to 30 cm between the spray tip
and the surface.
B) Keep the spray gun at right angles to the surface. This means
moving your entire arm back and forth rather than just exing
your wrist.
C) Keep the spray gun perpendicular to the surface, otherwise
one end of the pattern will be thicker than the other.
D) Trigger gun after starting the stroke. Release the trigger
before ending the stroke. The spray gun should be moving
when the trigger is pulled and released. Overlap each stroke
by about 30%. This will ensure an even coating.
i
When nished spraying, perform Pressure Relief
Procedure.
i
If you expect to be away from your spray project for
more than 1 hour, follow the Short Term Cleanup
procedure described in the Cleanup section of this
manual.
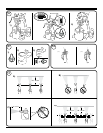
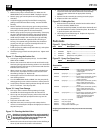
Figure 12 - Practice
1. Be sure that the paint hose is free of kinks and clear of objects
with sharp cutting edges.
2. Slide the PressureTrac™ to its to its lowest setting.
3. Turn the PRIME/SPRAY valve to SPRAY.
4. Slide the PressureTrac™ to its highest setting. The paint hose
should stien as material begins to ow through it.
5. Unlock the spray gun.
6. Trigger the spray gun to bleed air out of the hose.
7. When material reaches the spray tip, spray a test area to check
the spray pattern.
8. Use the lowest pressure setting necessary to get a good spray
pattern (A). If the pressure is set too high, the spray pattern
will be too light. If the pressure is set too low, tailing will
appear or the paint will spatter out in blobs rather than in a
ne spray (B).
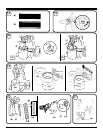
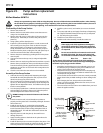
Figure 13 - Unclogging the Spray Tip
i
If the spray pattern becomes distorted or stops
completely while the gun is triggered, follow these
steps.
Danger
Do not attempt to unclog or clean the tip with your
nger. High pressure uid can cause injection
injury.
1. Release the trigger and lock the gun o. Rotate the reversible
tip arrow 180º so that the point of the arrow is toward the rear
of the gun (see gure 13).
i
Under pressure, the spray tip may be very dicult to
turn. Turn the PRIME/SPRAY knob to PRIME and
trigger the gun. This will relieve pressure and the tip
will turn more easily.
2. Turn the prime/spray knob to spray.
3. Unlock the gun and squeeze the trigger, pointing the gun at
a scrap piece of wood or cardboard. This allows pressure in
the spray hose to blow out the obstruction. When the nozzle
is clean, material will come out in a straight, high pressure
stream.
4. Release the trigger and lock the gun o. Reverse the tip so
the arrow points forward again. Unlock the gun and resume
spraying.
Cleanup
i
If you used latex spray materials, use warm, soapy
water to clean the sprayer. If you used oil-based spray
materials, use mineral spirits.
i
Do not use mineral spirits or paint thinner on latex
materials, or the mixture will turn into a jelly-like
substance which is dicult to remove.
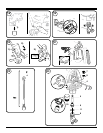
Figure 14 - Short Term Cleanup
i
Follow these steps when using latex materials only. If
using materials that are oil-based, follow the Cleanup
and Long-Term Storage steps.
A) Shutdown
1. Perform the Pressure Relief Procedure (see gure 6) and
unplug the sprayer.
2. Pour 1/2 cup water slowly on the top of the paint to prevent
the paint from drying.
3. Wrap the spray gun assembly in a damp cloth and place it in
a plastic bag. Seal the bag shut. Place the sprayer in a safe
place out of the sun for short-term storage.
B) Startup
1. Remove the gun from the plastic bag. Stir the water into the
paint.
2. Turn the PRIME/SPRAY knob to PRIME.
3. Plug sprayer in.
4. Turn the switch to ON (I).
5. Turn the PRIME/SPRAY knob to SPRAY. Test the sprayer on a
practice piece and begin spraying.
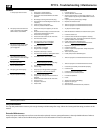
Figure 15 - Flushing the System
1. Lock the gun and remove spray tip assembly. Submerge
suction set into a bucket with appropriate cleaning solution
(a).
2. Place a waste container (b) next to the original material
container (c). The containers should be touching. Aim the
spray gun into the side of the original material container (c)
and hold the trigger.
3. While pulling the gun trigger, turn the pump ON (l), and turn
the PRIME/ SPRAY knob to SPRAY to purge material from the
hose back into the original container. Keep holding trigger
through next steps.
4. When cleaning solution ows from the spray gun, keep
holding the trigger and aim the spray gun into the side of the
waste container (ground gun with a metal container if ushing
with ammable solvent).
5. Trigger the gun until the uid owing out of the gun is clear.
You may need to dispose and obtain new cleaning solution.
6. Turn the PRIME/SPRAY knob to PRIME and trigger gun to
relieve pressure.