


11
PP119
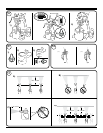
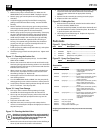
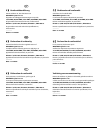
Figure 16 - Cleaning the Spray Gun
1. Make sure the pump is switched OFF (O). Make sure the
PRIME/SPRAY knob is turned to PRIME. Unplug the sprayer.
2. Remove spray gun from the paint hose using adjustable
wrenches.
3. Unclip the trigger guard (a) from the lter housing (b) by
pulling outward from the lter housing. Unscrew the lter
housing.
4. Remove the lter (c) from the spray gun housing and clean
with the appropriate cleaning solution (warm, soapy water for
latex paints, mineral spirits for oil-based materials).
5. Remove spray tip (d) from spray guard assembly. Clean spray
tip with a soft-bristled brush and the appropriate cleaning
solution. Be sure to remove and clean the washer (e) and
saddle seat (f) located in the rear of the spray tip assembly.
6. Replace the cleaned lter, tapered end rst, into the gun
housing. The tapered end (g) of the lter must be loaded
properly into the gun. Improper assembly will result in a
plugged tip or no ow from the gun.
7. Install spray tip (d), saddle seat (f) and washer (e), and replace
spray guard assembly.
8. Thread the spray gun back onto the paint hose. Tighten with
a wrench.
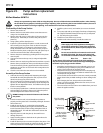
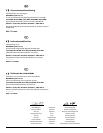
Figure 17 - Cleaning the Suction Set
1. Lock the gun and turn the pump OFF (O). Turn the PRIME/
SPRAY knob to PRIME.
2. Remove the suction hose and return tube and clean them by
hand using the appropriate cleaning solution. You should also
wipe the threads of the inlet nut (a) and remove and clean the
inlet lter at the suction set.
3. When suction set is clean, thread the suction tube back into
the inlet valve, and replace the return tube onto the return
tube tting (see gure 3). Replace clip.
4. Submerge the suction hose and return tube into a bucket of
new cleaning solution.
5. Turn the PRIME/SPRAY knob to PRIME. Turn the pump ON (l),
and trigger the gun into a waste container to relieve pressure.
6. Let the pump circlulate cleaning solution through the suction
set for 2-3 minutes. Turn the pump OFF.
Figure 18 - Long-Term Storage
1. Fill a cup or other container with separating oil or light
household oil and submerge the inlet valve into the oil.
2. Place a rag over the spray hose port, and turn the switch ON
(l). When the oil has been pumped from the cup, turn the
pump OFF (O).
3. Fully insert the Sureo™ valve.
4. Wipe the entire unit, hose and gun with a damp cloth to
remove accumulated paint. Replace the high pressure hose to
the paint hose port.
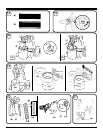
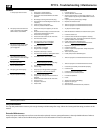
Figure 19 - Cleaning the Inlet Valve
i
Cleaning or servicing the inlet valve may be required if
the unit has priming problems. Priming problems may
be prevented by properly cleaning the sprayer and
following the long-term storage steps.
1. Remove the suction hose and return tube. Loosen the tting as
shown (a) and remove the Sureo™ valve solenoid.
2. Unscrew the inlet valve assembly (b) from the sprayer. Visually
inspect the inside and outside of the inlet valve assembly.
Clean any paint residue with the appropriate cleaning
solution.
3. Replace inlet valve assembly by screwing it into the sprayer.
4. Replace Sureo™ valve solenoid.
Figure 20 - Folding the Cart
1. With one hand on the handle, twist the knob on either side of
the cart toward the “DOWN” arrow.
2. When the knob is fully “DOWN”, this will release the handle and
it can be folded down until it is locked into place. Be careful not
to pinch the power cord with the cart.
3. Lift the leg lock, and fold the legs in. Replace the leg lock to
hold the legs into place (inset).
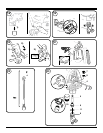
Parts Lists
Figure 21 - Spray Gun/Spray Hose
Item Part # Description .................................... Quantity
1 0418717 Complete gun assembly .......................................1
2 0418709 Tip, XL ..........................................................................1
3 0418713 Filter, L - XXL+ ...........................................................2
4 0418720 Spray hose, 15m, yellow .......................................1
Figure 22 - Spray Gun/Spray Hose
Part # Description .................................... Quantity
0418722 Suction set assembly .............................................1
Accessories
Part # Description
0418705 Spray tip, XS ..........................Water-soluble and solvent based
enamels and paints, oils and
release agents
0418706 Spray tip, S .............................Synthetic resin-based paints, PVC
paints
0418707 Spray tip, M ...........................Enamel paints, undercoats, primers,
llers, indoor latex paints and
indoor emulsions
0418708 Spray tip, L .............................Enamel paints, undercoats, primers,
llers, indoor latex paints and
indoor emulsions, anti-corrosive
paints
0418709 Spray tip, XL ..........................Enamel paints, undercoats, primers,
llers, indoor latex paints and
indoor emulsions, anti-corrosive
paints)
0418710 Spray tip, XXL .......................Enamel paints, undercoats, primers,
llers, indoor latex paints and
indoor and outdoor emulsions,
anti-corrosive paints, ame
retardants
0418711 Filter, XS - S (2 pack)
0418712 Filter, M (2 pack)
0418713 Filter, L - XXL+ (2 pack)
0418716 Pump section refurbishing kit
All spare parts listed above are wear parts, and are not covered by
warranty.