


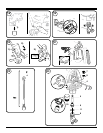


Assembly
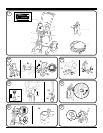
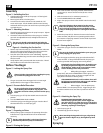
Figure 2 - Unfolding the Cart
1. Grab the pail bracket to lift up the sprayer. Lift the leg lock
and unfold the legs.
2. Move leg lock down to lock into place.
3. Twist the knob on either side of the cart toward the “UP”
arrow until it stops. Lift the handle until the motor housing
and handle locks into place. Be careful not to pinch the power
cord with the cart.
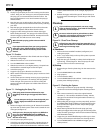
Figure 3 - Attaching the Hose
1. Thread the high pressure hose to the spray hose port. Tighten
with an adjustable wrench.
2. Thread the other end of the hose to the spray gun. Hold the
gun with one adjustable wrench, and tighten the hose nut
with the other.
i
The spray tip should not be attached until after the
sprayer and spray hose have been purged and primed.
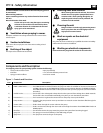
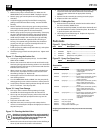
Figure 4 - Attaching the Suction Set
1. Remove cap from inlet valve (a). Thread the suction tube onto
the inlet valve and tighten rmly by hand. Be sure that the
threads are straight so that the tting turns freely.
2. Press the return tube onto the return tube tting. Squeeze
clip (found in plastic bag) over the return tube tting to secure
the return tube.
3. Verify that the seal is present inside the suction tube. Thread
the inlet lter into the end of the suction tube.
Before You Begin
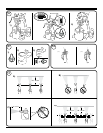
Figure 5 - Locking the Spray Gun
Danger
Always lock the trigger o when attaching the spray
tip or when the spray gun is not in use.
1. The gun is secured when the trigger lock is at a 90° angle
(perpendicular) to the trigger in either direction.
Figure 6 - Pressure Relief Procedure
Danger
Be sure to follow the Pressure Relief Procedure
when shutting the unit o for any purpose. This
procedure is used to relieve pressure from the spray
hose.
1. Lock the spray gun o. Flip the ON/OFF switch to the OFF
position.
2. Turn the PRIME/SPRAY knob to PRIME.
3. Unlock the spray gun and trigger spray gun into the side of
the material bucket. Lock the spray gun.
Priming
Figure 7 - Preparing to Prime
1. Before priming, squirt a teaspoon of separating oil into the
indicated area. Light household oil can be substituted if
necessary.
i
The PP119 has the Sureo™ valve that will activate
automatically when the pump is turned ON (l).
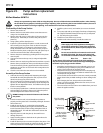
Figure 8 - Priming the Sprayer
1. Place a full container of spraying material underneath the
suction tube (a). Secure the return tube (b) into a waste
container.
2. Slide the PressureTrac™ to maximum pressure (+).
3. Turn the PRIME/SPRAY knob to PRIME.
4. Plug in the sprayer and move the ON/OFF switch to the ON (l)
position.
i
The unit will begin to draw material up the suction
tube, into the pump, and out the return tube. Let the
unit cycle long enough to remove test uid from the
pump, or until spray material is coming from the return
tube.
5. Switch the pump OFF (O). Remove the return tube from the
waste container and place it in its operating position above
the container of spraying material. Use the metal clip to bind
the two hoses together.
Figure 9 - Priming the Spray Hose
1. Unlock the spray gun and turn the PRIME/SPRAY knob to
PRIME.
i
The spray tip should not be attached to your spray gun
when purging your spray hose.
2. PULL the trigger and aim the spray gun at the side wall of a
waste container. If using oil-based materials, the spray gun
must be grounded while purging (see warning below).
Danger
Keep hands clear from uid stream. Ground the gun
by holding it against the edge of a metal container
while ushing. Failure to do so may lead to a static
electric discharge which may cause a re.
3. While pulling the trigger, switch the
pump ON (l), and turn the PRIME/SPRAY knob to Spray. Hold
the trigger until all air, water, or solvent is purged from the
spray hose and material is owing freely.
Danger
If the PRIME/SPRAY knob is still on SPRAY, there will
be high pressure in the hose and spray gun until the
PRIME/SPRAY knob is turned to PRIME.
4. Release trigger. Turn the prime/spray
knob to PRIME. Turn the pump OFF (O). Trigger the gun into
the waste container to be sure that no pressure is left in the
hose.
Figure 10 - Attaching the Spray Tip
Danger
POSSIBLE INJECTION HAZARD. Do not spray
without the tip guard in place. Never trigger the
gun unless the tip is in either the spray or the unclog
position. Always engage the gun trigger lock before
removing, replacing or cleaning tip.
1. Lock the spray gun o.
2. Thread the tip guard onto the gun.
i
When attaching the tip guard to the gun, align the tip
guard as shown in gure 10 (a), then tighten by hand
(b).
Spraying
9
PP119