


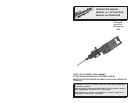
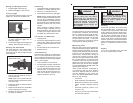


6 7
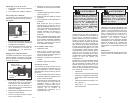
WARNING!
To reduce the risk of injury, wear
safety goggles or glasses with
side shields. Unplug the tool
before changing accessories or
making adjustments. Use
only specifically recommended
MILWAUKEE hammer irons.
Others may damage tool.
OPERATION
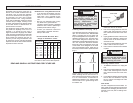
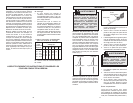
Grounded tools require a three wire ex-
tension cord. Double insulated tools can
use either a two or three wire extension
cord. As the distance from the supply out-
let increases, you must use a heavier
gauge extension cord. Using extension
cords with inadequately sized wire causes
a serious drop in voltage, resulting in loss
of power and possible tool damage. Refer
to the table shown to determine the re-
quired minimum wire size.
The smaller the gauge number of the wire,
the greater the capacity of the cord. For
example, a 14 gauge cord can carry a
higher current than a 16 gauge cord. When
using more than one extension cord to make
up the total length, be sure each cord con-
tains at least the minimum wire size re-
quired. If you are using one extension cord
for more than one tool, add the nameplate
amperes and use the sum to determine the
required minimum wire size.
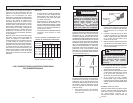
Guidelines for Using Extension Cords
If you are using an extension cord out-
doors, be sure it is marked with the
suffix W-A (W in Canada) to indi-
cate that it is acceptable for outdoor
use.
Be sure your extension cord is prop-
erly wired and in good electrical
condition. Always replace a damaged
extension cord or have it repaired by a
qualified person before using it.
Protect your extension cords from
sharp objects, excessive heat and
damp or wet areas.
READ AND SAVE ALL INSTRUCTIONS FOR FUTURE USE.
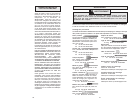
Recommended Minimum Wire
Gauge for Extension Cords*
Extension Cord Length
* Based on limiting the line voltage drop to
five volts at 150% of the rated amperes.
Nameplate
Amperes
0 - 2.0
2.1 - 3.4
3.5 - 5.0
5.1 - 7.0
7.1 - 12.0
12.1 - 16.0
16.1 - 20.0
25'
18
18
18
18
16
14
12
75'
18
18
16
14
12
10
100'
18
16
14
12
10
150'
16
14
12
12
50'
18
18
18
16
14
12
10
EXTENSION CORDS
Always clean and grease the iron shank
before inserting the iron into the tool. In-
spect the end of the bit shank to make sure
it is not mushroomed, as described in
Maintaining Hammer Irons. Always make
sure that the iron is in good working condi-
tion before use.
1. To install a hammer iron, fit the dust
shield over the iron as shown.
2. Pull out the spring-loaded bit lock and
rotate it 180° until the groove in the bit
lock is flush with the bore of the nose-
piece.
3. Lightly grease the shank of the iron and
insert into the nosepiece, making sure
that the notch in the shank faces to-
ward the bit lock.
4. Pull out the spring-loaded bit lock and
rotate it 180° to lock iron in place.
5. Pull on the iron to ensure that it is locked
in place.
Removing Hammer Irons
1. To remove a hammer iron, unplug the
tool.
2. Pull out the spring-loaded bit lock and
rotate it 180° until the groove in the bit
lock is flush with the bore of the nose-
piece.
3. If you used the hammer recently, handle
the iron with care because it may still
be hot. Pull the iron straight out of the
hammer nose.
Dust Shield
The tool is shipped with a dust shield. Al-
ways install the dust shield to prevent dust
and debris from damaging the internal com-
ponents of the tool (See Installing Ham-
mer Irons).
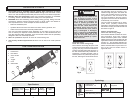
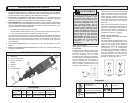
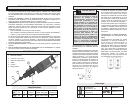
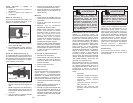
Installing Hammer Irons (Fig. 1 & 2)
Your demolition hammer is designed to ac-
cept 3/4" hex hammer irons. MILWAUKEE
offers a complete line of irons which are
fully interchangeable with competitive 3/4"
demolition hammers irons. The 5335 ham-
mer IS NOT designed to accept 3/4" bits
designed for the MILWAUKEE Rotary Ham-
mer. The important difference between
these two types of accessories is the end
of the shank. Irons designed for the 5335
have a hex-shaped shank, while bits for
the Rotary Hammer have a cylindrical shank
(Fig. 1).
WARNING!
The hammer iron and the nose-
piece of the tool will get hot during
normal use. Always use caution
when removing hot irons.
Dust shield
Hammer iron
Fig. 2
Incorrect
Correct
Cylindrical shank
Hex shank
Fig. 1