


8 9
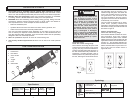
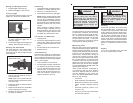
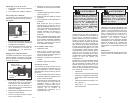
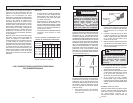
Trigger
Trigger
lock
Fig. 3
Starting and Stopping the Tool
1. Pull the trigger to start the tool.
2. Release the trigger to stop the tool.
Locking Trigger
The lock button holds the trigger in the ON
position for continuous full-speed use.
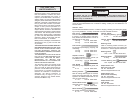
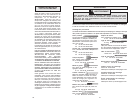
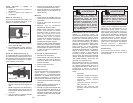
Side handle knob
Side handle
Fig. 4
1. To lock the trigger, hold in the lock but-
ton while pulling the trigger, then re-
lease the trigger.
2. To unlock the trigger, pull the trigger and
release. The lock button will pop out.
Adjusting the Side Handle
The 5335 features a side handle which
can be adjusted to any position 360°
around the tool as well as angles forward
and backward.
1. To adjust the side handle, loosen the
knob on the side handle by turning it
counterclockwise.
NOTE: Make sure to loosen the knob
enough to permit the serrations to pass
over each other.
2. Rotate the handle to desired position
around the tool.
3. Place the side handle at a comfortable
forward-and-backward angle.
4. Retighten the knob on the side handle
by turning it clockwise.
Hammering
1. Install the hammer iron following the in-
structions in Installing Hammer Irons.
2. Place iron on intended work site.
3. While holding the tool firmly, pull trigger.
NOTE: Use only enough pressure to hold
the tool in place and to prevent the ham-
mer iron tip from wandering. This tool
has been designed to achieve peak per-
formance with only moderate pressure.
Excessive pressure will only tire the
operator.
When chiseling or chipping, hold the
tool at an angle to the work area. For
best performance, work from a corner
or close to the edge of the work area
and break off a small area at a time.
If a Hammer Iron Gets Stuck
1. Unplug the tool.
2. Pull out the spring-loaded bit lock and
rotate it 180° until the groove in the bit
lock lines up with the bore of the nose-
piece.
3. Pull the hammer off of the stuck iron.
4. Remove the iron.
Cold Hammering
If the hammer is stored for a long period of
time or at cold temperatures, the lubrica-
tion may become stiff and the tool may not
hammer initially or the hammering might be
weak. If this happens:
1. Insert a hammer iron into the tool.
2. Pull the trigger and apply the hammer
iron against a scrap piece of concrete.
3. Turn the tool ON and OFF every few
seconds. After 15 seconds to 2 min-
utes, the tool will start hammering nor-
mally. The colder the hammer is, the
longer it will take to warm up.
Maintaining Hammer Irons
Through normal use, the tip of the hammer
iron shank can mushroom over and cause
the iron to become stuck inside the ham-
mer. To prevent this from happening, peri-
odically remove the hammer iron from the
tool and inspect the shank. If the shank
starts to mushroom, have the iron ground
or sharpened by skilled personnel.
Maintaining Tools
Keep your tool in good repair by adopting a
regular maintenance program. Before use,
examine the general condition of your tool.
Inspect guards, switches, tool cord set and
extension cord for damage. Check for
loose screws, misalignment, binding of
moving parts, improper mounting, broken
parts and any other condition that may af-
fect its safe operation. If abnormal noise
or vibration occurs, turn the tool off imme-
diately and have the problem corrected
before further use. Do not use a damaged
tool. Tag damaged tools DO NOT USE until
repaired (see Repairs).
Under normal conditions, relubrication is
not necessary until the motor brushes
need to be replaced. After six months to
one year, depending on use, return your
tool to the nearest MILWAUKEE service
facility for the following:
Lubrication
Brush inspection and replacement
Mechanical inspection and cleaning
(gears, spindles, bearings, housing,
etc.)
Electrical inspection (switch, cord,
armature, etc.)
Testing to assure proper mechanical
and electrical operation
WARNING!
To reduce the risk of injury,
always unplug your tool before
performing any maintenance.
Never disassemble the tool or try
to do any rewiring on the tool's
electrical system. Contact a
MILWAUKEE service facility for
ALL repairs.
WARNING!
To reduce the risk of injury,
electric shock and damage to the
tool, never immerse your tool in
liquid or allow a liquid to flow
inside the tool.
MAINTENANCE
Cleaning
Clean dust and debris from vents. Keep
the tool handles clean, dry and free of oil
or grease. Use only mild soap and a damp
cloth to clean your tool since certain clean-
ing agents and solvents are harmful to plas-
tics and other insulated parts. Some of
these include: gasoline, turpentine, lacquer
thinner, paint thinner, chlorinated cleaning
solvents, ammonia and household deter-
gents containing ammonia. Never use flam-
mable or combustible solvents around
tools.
Repairs
If your tool is damaged, return the entire
tool to the nearest service center.