


Getting Started Using Profile Manager
Getting Started
98
P1065697-002 10/27/14
Getting Started
After you have completed installation, open Profile Manager. Profile Manager opens to the
Devices page.
To set up Profile Manager, follow these steps:
1. Add Your Devices on page 98.
2. Set Tags on page 98.
3. Create Base Profile on page 99.
4. Deploy Profile to Printers on page 99.
1. Add Your Devices
Profile Manager automatically detects all the devices on your network. Begin by adding the
devices you want to manage.
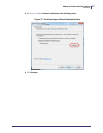
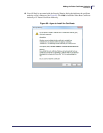
a. In the Devices tab, click +Add Device.
b. In the Add Device field, add your printers by performing ONE of the following:
• Select the device from the ones shown.
• Enter the device name, IP address, or device description.
• Click
View Configured Printers… and select the device from those shown.
c. Click Apply to add the printer.
You can manage your devices individually, or you can filter or group them by status, models,
printer types, or media types.
2. Set Tags
Group printers by creating Tags, and adding printers to each Tag.
Begin by creating a Tag to group your devices.
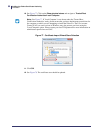
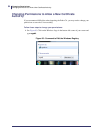
a. On the Tags tab, select +Add Tag.
b. Enter Tag Name and Tag Description.
c. Click Create Tag.
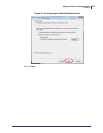
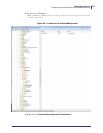
After you create a Tag, go to the Devices tab to associate one or more devices with your Tag.
a. On the Devices tab, select the device you want to associate with your Tag.
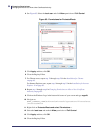
b. On the Tags bar on your left, click the Edit link.
A new dialog box will appear and show all the tags in the system.
c. Click on the tags that you want to assign to the device.