• Only use a perforated roller cover. Standard roller covers will not work.
• Inspect roller cover for lint before painting, if needed wash and dry before using.
• When using the R
APIDROLLER
TM
for the first application, it will take most of the paint in the RAPIDROLLER
TM
t ube to saturate the roller cover. Asecond
fill may be needed.
• Keep roller moving while pushing plunger in or squeezing trigger to prevent dripping.
• Stop pushing plunger in or squeezing trigger if the roller starts to skid, slide or drip.
• When painting in tight areas partially fill R
APIDROLLER
T
M
or pivot the frame . This reduces its overall length.
• When leaving R
A
PID
RO
LLER
TM
unattended for a longer period of time, wrap roller in a plastic bag to prevent drying, removing as much air as possible
from bag.
• Make sure the type of paint you use can be cleaned with either mineral spirits (for oil-based paints) or a warm water and soap solution (for water
soluble paints like latex).
•
Use drop cloths to protect your floors and anything else in the room that you do not want accidentally splattered with paint.
• When using kickstand,alwayspivot head to straight position and release pressurebypulling plungerout slightly.
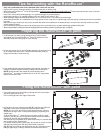
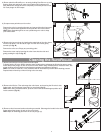
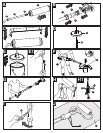
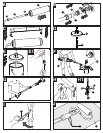
1.) Lubricate part (a) and (b) using petroleum jelly provided. Attach
assembled roller (c) onto R
APIDROLLER
TM
frame (d). Make sure roller
assembly snaps into locking clip on outer end cap.
2.) Push roller frame (a) over end of handle assembly (d) ensuring O-ring
(b) is seated inside roller frame. Thread handle assembly collar (c)
snugly onto threads of roller frame (a).
3.) The spatter shield helps reduce spatter when painting, especially on
ceilings. Position the spatter shield by rotating around roller frame.
NOTE: Spatter shield is also helpful to prevent dripping when
R
APIDROLLER
TM
is resting on kickstand and is not in use. Just position
spatter shield under roller.
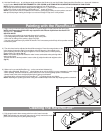
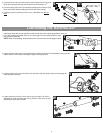
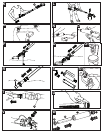
1.) Insert the small end of the fill tube (a) through the hole in the bottom
side of the paint can cover (b).
Push in until tight and to the ridge of the fill tube.
2.) Snap paint can cover onto paint can (fig. E). Lubricate top of fill tube
stem with a small amount of petroleum jelly included in carton.
NOTE: The can cover will not fit on some paint containers. It can be
stretched over larger cans or compressed slightly by squeezing to fit
smaller cans.
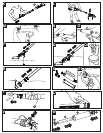
To fill the R
APIDROLLER
TM
when the can cover does not fit your paint
container, omit the can cover and place fill tube directly into container.
Hold the fill tube with hand to stabilize as needed.
A fill tube can clip is available as an optional accessory for use with other
size containers. See “Accessories”.
For deeper containers like 5 gallon pails, fit a section of ¾ inch I.D. (inner
diameter) clear tubing over the ribs of the fill tube to extend it
(fig. E1) and clip to side of pail with fill tube can clip. Cut bottom end of
tubing at slight angle. Tubing is available at most hardware stores.
3
Tips for painting with the RAPIDROLLER
T
M
Preparing the RAPIDROLLER
T
M
to paint
A
B
d
a
b
c
C
c
d
a
b
Filling the RAPIDROLLER
TM
with paint
D
a
b
E
E1


