


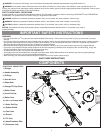
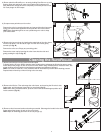
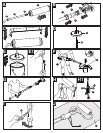
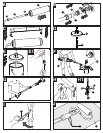

3.) Hold the RAPIDROLLER
T
M
at a 45 degree angle and place the fill valve (a) over the fill tube. Gently push the RAPIDROLLER
T
M
down until it bottoms
on the fill tube. MAKE SURE THE ORANGE FILL CAP COVER (a) IS COMPLETELY COVERED BY SHROUD OF CAN COVER.
NOTE: Remove cardboard spacer, and squeeze trigger to free up the plunger.
Pull plunger (b) all the way back to draw paint into R
APIDROLLER
TM
. (This may take some force.) Once tube
is full you are ready to start painting. Lift RAPIDROLLER
TM
slowly off fill tube.
N
OTE: If you do not receive a complete fill the first time, push plunger slowly to return paint to can and
t
hen pull back plunger making sure angle is correct and orange fill cap cover is fully seated.
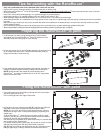
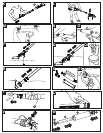
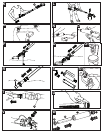
1.) Begin rolling on wall and push plunger handle or squeeze trigger to feed paint into the roller cover.
NOTE: Initial saturation of the roller may require the full amount of paint from the first fill. Fill
R
APIDROLLER
TM
as needed.
H
ELPFUL HINTS
• The trigger only needs to be squeezed when paint is needed.
• If you are getting a dot pattern when painting, apply more paint.
• If the roller is sliding on the surface, apply less paint.
• You may notice petroleum jelly within the handle. This is necessary and will help in its operation and will
not affect the paint.
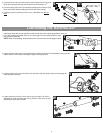
2.) The roller head can be adjusted to three different angles. Press the orange button on the
roller head to change the angle from straight to 40 or 80 degrees. Use straight on for
general painting and 40 or 80 degree angles for hard to reach places or when painting
close to ceiling or edging (fig. H).
NOTE: The handle (a) can be rotated to make it more comfortable when painting with an
angled roller frame.
To rotate handle to desired position, loosen collar (b), adjust handle and retighten collar
(fig H1).
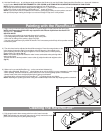
3.) When not in use rest theR
APIDROLLER
TM
on the convenient kickstand (a).
• When using kickstand, R
APIDROLLER
TM
should always be on a drop cloth (b) or over newspaper in case of drips.
• When painting, kickstand should be pointed away from roller to avoid getting spatter on kickstand.
• Always rotate roller to the straight position before pacing on kickstand.
• To prevent drips, relieve pressure on R
APIDROLLER
TM
by pulling plunger out slightly.
NOTE: Attaching the spatter guard when using the kickstand helps insure that any dripping paint is contained.
1.) Pull plunger back to draw excess paint from roller frame into tube.
HINT: Place thumb over orange fill cap cover (a) to help remove the most
paint from the frame prior to pulling back plunger.
4
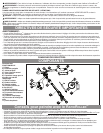
F
Painting with the RAPIDROLLER
T
M
a
b
G
I
a
a
b
J
H
a
b
H1
Cleaning the RAPIDROLLER
TM
a
K