Third, the quick clean system allows for a faster
clean-up when your project is complete. One or
two flushes through the quick clean system
gives you a head start on cleaning the nozzle,
the atomizer, the pump and piston. Please
follow recommended cleaning steps in this
manual when performing a final clean of the
system.
HOW TO USE THE QUICK CLEAN SYSTEM
• Unplug the sprayer from the power source.
• Fill the quick clean fill cup, to the 95ml fill line,
with water or the approprate cleaning solution.
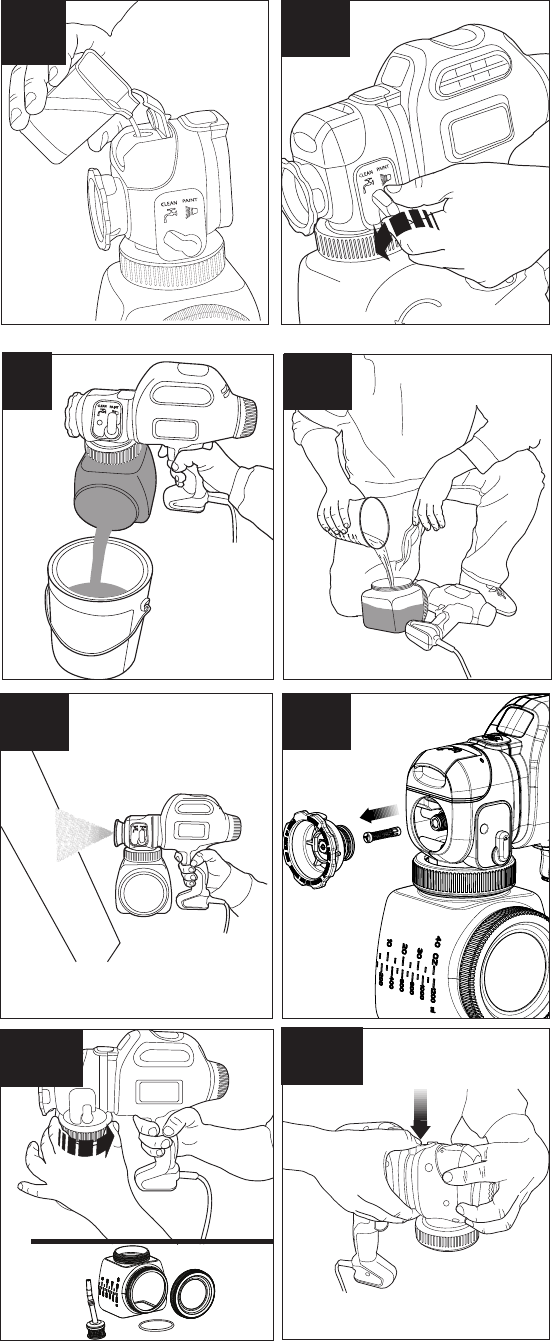
• Open the quick clean door, and pour in the
cleaning solution as shown in figure O. Do not
overfill the reservoir.
• Switch the quick clean lever from paint to
clean (figure O1).
• Plug in the sprayer.
• Spray into a waste container, cardboard box or
test surface to completely flush the sprayer
system.
• Once the spray pattern turns to only the color
of the cleaning solution, begin cleaning.
• You may need to flush more than once.
NOTICE: Please note, this is not the final
cleaning step.
TO BEGIN CLEANING:
• Unplug the sprayer from the power source.
• Unscrew the lid from the side of the canister
and pour any remaining liquid back into the
original container (figure P).
• Pour a small amount of the appropriate
cleaning solution into the canister (figure P1).
• Warm soapy water for water based materials
• Manufacturers recommended cleaning
solution for oil based materials
• Replace the lid on the canister securely and
vigorously shake the sprayer.
• Unscrew the lid from the side of the canister
and properly dispose of cleaning solution.
• Refill the canister with a small amount of new
cleaning solution (figure P1). Screw lid securely
on canister.
• Plug in the cord and spray the cleaning
solution through the sprayer onto scrap material
for 5 seconds (figure P2).
• Unplug the sprayer from the power source.
• Properly dispose of cleaning solution.
• Remove the spray nozzle, by turning
counterclockwise, then remove the atomizer
(figure P3). Refer to figures C & C1.
• Unscrew the canister from the sprayer by
turning the collar as shown in figure P4. Re-
move the pickup tube and filter and o-ring from
the sprayer. Clean the parts with the cleaning
brush in the appropriate cleaning solution.
• Remove the front housing of the sprayer, by
pressing down on the release button and pulling
the front housing off of the sprayer
(figure P5, P6).
1
2
O
P
O1
P1
P2
P3
P5
P4
13


