


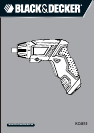


6
ENGLISH
The charger is intended for indoor use only.
Read this entire manual carefully before using the
appliance.
Electrical safety
Your charger is double insulated; therefore no
earth wire is required. Always check that the mains
voltage corresponds to the voltage on the rating
plate. Never attempt to replace the charger unit with a
regular mains plug.
• If the supply cord is damaged, it must be replaced by the
manufacturer or an authorised Black & Decker Service
Centre in order to avoid a hazard.
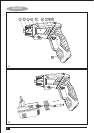
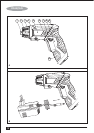
Product Features
1. Keyless chuck
2. Gear box
3. LED
4. LED switch
5. Housing
6. Switch
7. Reverse-rotation lever
8. Handle casing
9. Pivot release button
10. Charging hole
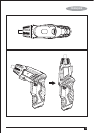
Charging the Battery
Charging as shown, Must turn off the screwdriver. Only Red
lights up on the power indicator when you charging.
Charging time: 3-5 Hours.
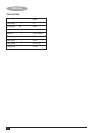
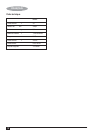
Power indicator light
Three different colors of light
(From Left : Green. Yellow. Red)
Charging State:
Only Red lights up when charging.
Operation State:
Green. Yellow and red light will light up at the same time,
With continued working, the battery voltage drops, and when
the Red light turns off, this implies that the battery is used up
and needs charging.
Inserting Tool Bits
Important! Always Turn off the machine before you change
the screw bit to avoid unintentional starting of the machine.
On/Off Trigger.
On/Off Trigger
Use the On/Off trigger to start the machine and keep holding
it for continuous operation.
Reverse-rotation Lever
Important! This is a can foldable cordless screwdriver. The
machine has to come to a complete stop before the reverse
rotation lever can be used, otherwise the machine may be
damaged.
Use the reverse-rotation lever to switch between clockwise
(normal) and anticlockwise rotation or vice-versa, With the
reverse-rotation lever in the central position the trigger switch
is locked and cannot be depressed. Put the reverse-rotation
lever in the central position before you put the machine down,
to avoid unintentional starting.
Torque adjustment
Torque setting 8 torque+1 drilling setting You can control the
maximum torque applied to the drill bit with the torque control
knob.
Attention! The torque control knob should only be operated
when the machine is not running; otherwise the machine may
be damaged.
To set the drill to the lowest available torque setting, twist the
torque control knob until the small arrow on the drill-housing
points to the “1” stamped on the torque control knob. In this
position the torque clutch will slip with light drilling resistance.
The higher the number the arrow points to on the torque
control knob, the larger the maximum torque that can be
applied before the torque clutch will slip. To set the machine
to maximum available torque twist the torque control knob
until the arrow points to the drill symbol.