


30
Removal and Installation
of the Blade
Disconnect battery pack from tool
before performing any assembly,
adjustments, changing accessories, or storing the tool.
Such preventive safety measures reduce the risk of starting
the tool accidentally.
Note: Clean blade of any excess oil before installation.
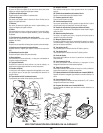
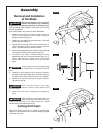
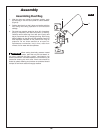
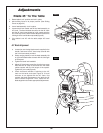
1. Rotate the lower guard
1 by hand. Loosen, but do not
remove, the cover plate screw
2 using a Phillips or
straight screwdriver (Figure 2).
2. Rotate the cover plate
3 counterclockwise so the blade
bolt
4 is exposed (Figure 2).
3. Press and hold the arbor lock. Use the blade wrench to
remove the blade bolt by turning wrench clockwise.
NOTE: The blade bolt has a left hand thread.
4. Remove the blade bolt
4, outer washer 5 and the blade 6.
Inner washer
7 should not be removed (Figure 3).
5. To install the 10
" blade, fit blade between the chip
deflectors
8 and onto the arbor shaft 9 (Figure 3 & 4).
NOTE: Make sure the rotation arrow on the blade
matches the clockwise rotation arrow on the lower
guard.
To avoid injury, do not use a blade larger
or smaller than 10
" diameter and 5/8"
arbor.
6. Replace the outer washer
5 in the proper orientation,
and tighten blade bolt
4 finger tight. Press the arbor lock
and tighten blade bolt
4 securely, but do not overtighten.
7. Rotate cover plate
3 clockwise to original position.
Tighten the screw
2.
Never use saw without cover plate
securely in place. Lower guard will not
function properly.
8. Be sure the arbor lock is released so the blade turns
freely.
After installing a new blade, lower the
blade into the table slot and check for any
contact with the base or turn table structure. If blade
contacts table, seek authorized service.
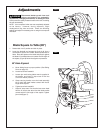
Cutting Kerf Insert
NOTE: New insert needs to be cut initially to provide blade
clearance. This should be done by carefully making a straight
cut through the insert.
Assembly
FIG. 2
FIG. 3
FIG. 4
1
3
3
2
5
4
6
5
4
6
9
7
2
9
8
WARNIN
G
!
WARNIN
G
!
WARNIN
G
!
WARNIN
G
!