


28.
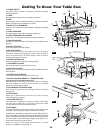
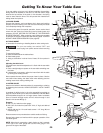
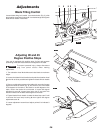
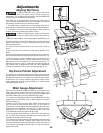
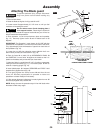
Adjusting Blade Parallel To
The Miter Gauge Slots
The blade was adjusted parallel to the miter gauge slots at the
factory. In order to insure accurate cuts and help prevent
kickback, this adjustment should be rechecked. If adjustment is
necessary, follow the steps below.
To prevent personal injury, always disconnect the
plug from power source before making any
adjustments.
1. Turn elevation wheel and raise blade as high as it will go.
2. Select a tooth on the rear of saw blade that is set to the left
when viewing blade from the front of saw, and mark 1 this tooth
with a pencil.
3. Place the base of a combination square against the edge of the
miter gauge slot, and extend the sliding rule of square so it just
touches the marked tooth.
4. Rotate blade and check the same marked blade tooth at the
front of the saw table (Fig. 8).
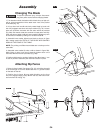
5. If the front and back measurements, shown in Figure 8, are not
identical, loosen the four alignment bolts 2, located on the
underside of the table at the front and rear of the saw with hex
wrench supplied with your saw (Fig. 9 & 10). Carefully move the
saw blade until the blade is parallel to the miter gauge slot, and
securely tighten all four bolts.
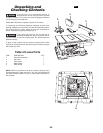
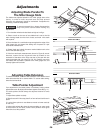
Adjusting Table Extension
To extend the table, raise the table extension lock handle 3 and
slide table extension 4 to desired width. To secure table setting,
lower the lock handle 3.
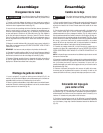
Table Pointer Adjustment
If an adjustment to the table pointer is necessary, loosen pointer
adjustment screw 5, adjust pointer 6 and tighten screw 5 (Fig. 11).
The table pointer should always be adjusted relative to fence
pointer.
1. Adjust fence pointer to (zero).
2. Slide fence until it hits stop plate 7 on front rail and lock fence in
place.
3. Lock at fence pointer to see distance moved on lower scale (at
or near 13".)
4. Adjust table pointer 6 to have the same reading on upper scale
as that shown on the fence pointer. Both pointers must agree
when fence is at this position.
Adjustments
WARNING
!
FIG. 8
FIG. 9
2
2
FIG. 10
FRONT OF TABLE
REAR OF TABLE
2
2
FIG. 11
6
5
1
3
4