


-9-
Influences on Accuracy
The ambient temperature has the greatest
influence. Especially temperature differences
occurring from the ground upward can divert
the laser beam.
Because the largest difference in
temperature layers is close to the ground,
the tool should always be mounted on a
tripod when distances exceeding 20 m. If
possible, also set up the tool in the center of
the work area.
Apart from exterior influences, device-
specific influences (such as heavy impact or
falling down) can lead to deviations.
Therefore, check the accuracy of the tool
each time before starting your work.
Firstly, check the leveling accuracy of the
horizontal laser line and then the leveling
accuracy of the vertical laser line.
Should the tool exceed the maximum
deviation during one of the tests, please
have it repaired by a Bosch after-sales
service.
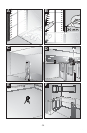
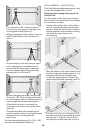
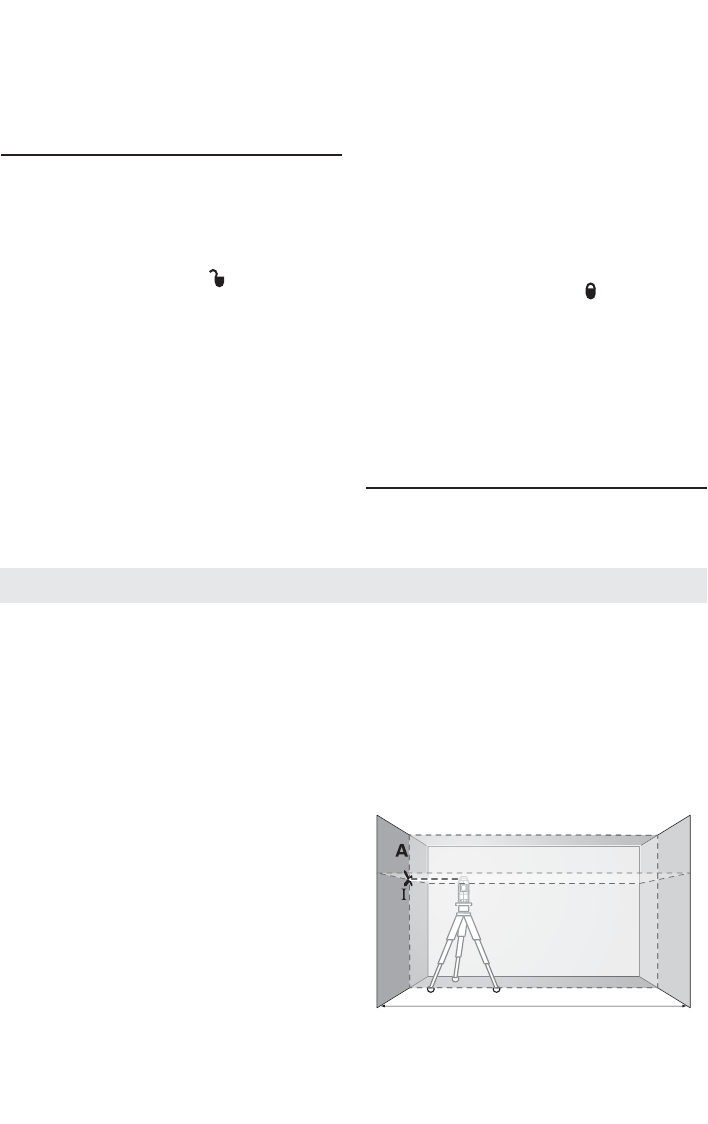
Checking the Horizontal Leveling
Accuracy.
A free measuring distance of 16 ft on a firm
surface in front of two walls A and B is
required for the check.
– Mount the tool onto a tripod, or place it
on a firm and level surface close to the
wall A. Switch the tool on. Select cross-
line operation with automatic leveling.
– Direct the laser against the close wall A
and allow the tool to level in. Mark the
center of the point where the laser lines
cross each other on the wall (point I).
Leveling Accuracy
When the pulse function is switched on, the
visibility of the laser lines is reduced for the
human eye. Therefore, shut off the pulse
function by pushing button 3 again when
working without laser receiver. When the
pulse function is switched off, the pulse-
function indicator 5 is deactivated.
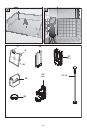
Automatic Leveling
Working with Automatic Leveling
Position the tool on a level and firm support,
attach it to the holder 19 or to the tripod 21.
When working with automatic levelling, push
the On/Off switch 7 to the “ on” position.
After switching on, the leveling function
automatically compensates irregularities
within the self-leveling range of ±4°. The
leveling is finished as soon as the laser
beams do not move any more.
If automatic leveling is not possible, e.g.
because the surface on which the tool stands
deviates by more than 4° from the horizontal
plane, the laser lines begin to flash rapidly.
When the audio signal is activated, a fast-
beat signal sounds for 30 s (maximum). This
alarm is deactivated within 10 s after
switching on, in order to allow adjustment of
the tool.
Set up the tool in level position and wait for
the self-leveling to take place. As soon as the
tool is within the self-leveling range of ±4°, all
laser beams light up continuously and the
audio signal is switched off.
In case of ground vibrations or position
changes during operation, the tool is
automatically levelled in again. To avoid
errors, check the position of the horizontal
and vertical laser
line with regard to the reference points upon
releveling.
Working without Automatic Leveling
For working without automatic leveling, slide
the On/Off switch 7 to the “ on” position.
When automatic leveling is switched off,
indicator 6 lights up red and for the first 30 s
laser beams flash slowly.
When the automatic leveling is switched off,
the tool can be held by hand or placed on an
inclined surface. In cross-line operation, the
two laser lines do not necessarily run at a
right angle to each other.
Working Advice
• Always use the center of the laser point
for marking. The size of the laser point
changes with the distance.
B
16 ft (5m)