


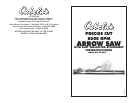

-3-
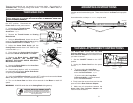
O
N
O
F
F
2
4
Vacuum and vacuum hose not included
11
12
1
16
WARNING! Before cleaning, assembling or disassembling the Arrow
Saw, make sure it is turned OFF and the PLUG IS REMOVED FROM THE
OUTLET/POWER SOURCE!
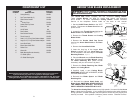
3
15
17b
17
17a
O
N
O
FF
1
8
10
13
14
12
9
5
7
10
6
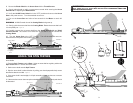
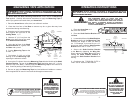
FIGURE 11
Arrow Shaft
Shaft Position
Bracket
Cutting Blade
Arrow Shaft
Guide
The Arrow Saw comes with 2 Spin Testers that allow you check the straightness of
arrow shafts.
1. Place the Spin Testers onto the Base. Using an arrow shaft as a guide, position the
Spin Testers within 1” of each end of the shaft.
2. Set the arrow shaft onto the Spin Testers.
3. Spin the arrow shaft in either direction by rolling your thumb perpendicularly across
the shaft at about the middle. Figure 12
4. If the arrow shaft is true/straight, it will spin smoothly without any bounce or excess
movement.
5. If the arrow bounces or does not spin true/straight, the arrow shaft is faulty and should
be discarded.
USING THE SPIN TESTERS
8. Secure the Blade Shield to the Arrow Saw with the Thumb Screws.
9. Check cutting depth to verify no movement occurred while securing the Arrow
Shaft Guide or replacing the Blade Shield.
10. Verify the On/Off Power Switch is in the “OFF” position and connect the Arrow
Saw to the power source. Turn the attached vacuum on.
11. Turn on the Arrow Saw and allow a few seconds for the Motor to reach full
speed.
WARNING: ALWAYS stand clear of the Cutting Blade during start up.
14. Gently guide the arrow shaft into the Cutting Blade. Rotate the arrow shaft until
it is completely cut. Figure 11
15. Carefully remove the cut arrow shaft from the Arrow Shaft Guide and Shaft
Position Bracket. Be careful to not allow the arrow shaft to further contact the
Cutting Blade.
16. Turn the Arrow Saw to the ‘OFF’ Position. Turn off the attached vaccuum.
Disconnect from the power source when not in use.
FIGURE 12
Spin Testers
Arrow Shaft
-10-