


-6-
OPERATING INSTRUCTIONS
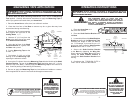
1. Place the Arrow Saw on a
at, level work surface.
2. Place the Shaft Position Bracket onto
the Base.
3. Locate the left face of the Shaft Position
Bracket at the line on the Measuring Tape
indicating the length of shaft you want to
cut. For example, if you want to cut a 31”
long arrow shaft, locate the Shaft Position
Bracket face at the 31” mark. Figure 4
4. Secure the Shaft Position Bracket
to the Base by tightening the Wing Nut.
Slowly tighten the Wing Nut while rmly
holding the Shaft Position Bracket to
prevent the Shaft Position Bracket from
moving.
5. Continue to the “THROUGH CUTS” or
“ROLL CUTS” section of this manual.
MEASURING TAPE APPLICATION
The Arrow Saw with Dust Collecting Attachment comes without the Measuring
Tape applied. Carefully follow these instructions to apply the Measuring Tape to
ensure you get the best results from your Arrow Saw.
1. Place the Arrow Saw on a at, level, non-skid work surface.
2. Clean the front face of the Base to remove any dirt or grime that may have
accumulated during manufacturing.
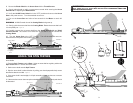
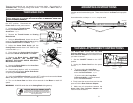
3. Place the end of a tape measure
rmly against the right side of the
Cutting Blade. Figure 3
4. Measure 6” (15.2 cm) from the
Blade to the back face of the notch
in the Shaft Position Bracket.
5. Using the left face of the Shaft
Position Bracket as a guide, mark
the Base with a pencil.
6. Cut the Measuring Tape at the
5” mark. Figure 3
7. Peel about 4” (10.2 cm) of the
backing off of the Measuring Tape
exposing the adhesive surface.
8. Line up the 6” indicator line on the Measuring Tape with the left side of the Shaft
Position Bracket. The top of the Measuring Tape should be about 1/2” (1.3 cm)
below the top of the Base. Carefully apply the Measuring Tape a few inches at a
time. Continue peeling off the backing as necessary.
9. Be sure to apply the Measuring Tape level and without air bubbles or creases.
Such irregularities will result in inaccurate shaft length measurements.
FIGURE 3
Left
Face
of Shaft
Position
Bracket
Shaft
Position
Bracket
Right Side
of
Cutting
Blade
Measuring
Tape
Front
Face
of
Base
WARNING!
READ AND FULLY UNDERSTAND ALL INSTRUCTIONS
AND WARNINGS PRIOR TO USING THIS SAW.
YOUR SAFETY IS MOST IMPORTANT! FAILURE TO
COMPLY WITH PROCEDURES AND SAFE GUARDS
MAY RESULT IN SERIOUS INJURY OR PROPERTY
DAMAGE. REMEMBER: YOUR PERSONAL SAFETY
IS YOUR RESPONSIBILITY!
WARNING! Before cleaning, assembling or disassembling the Arrow
Saw, make sure it is turned OFF and the PLUG IS REMOVED FROM THE
OUTLET/POWER SOURCE!
FIGURE 4
Shaft
Position
Bracket
Base
Bracket
Face
Wing Nut
-7-
WARNING! Before cleaning, assembling or disassembling the Arrow
Saw, make sure it is turned OFF and the PLUG IS REMOVED FROM THE
OUTLET/POWER SOURCE!
WARNING!
Be sure to follow ALL
SAFETY WARNINGS
and precautions that
are contained in this
instruction manual
before using this
appliance!
WARNING!
Be sure to follow ALL
SAFETY WARNINGS
and precautions that
are contained in this
instruction manual
before using this
appliance!
CAUTION ROTATING SHARP BLADE!
Toavoidsevereinjurykeepngers,handsandotherforeign
objectsclearofthesawopeningBladeandMovingPartsofthe
ArrowSaw.WearapprovedSafetyGlassesandKevlarGloves
whenusingtheArrowSaw.
CAUTION ROTATING SHARP BLADE!
Toavoidsevereinjurykeepngers,handsandotherforeign
objectsclearofthesawopeningBladeandMovingPartsofthe
ArrowSaw.WearapprovedSafetyGlassesandKevlarGloves
whenusingtheArrowSaw.