


MOUNTING INSTRUCTIONS
-5-
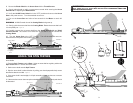
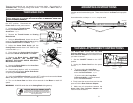
For best results, mount the Arrow Saw to a solid, level surface to prevent excess
vibration and movement during use. There are two holes in the Base for this purpose.
Figure 1
As an alternative, c-clamps (Not Included) may be used.
O
N
O
F
F
Mounting Holes
VACUUM ATTACHMENT INSTRUCTIONS
The Arrow Saw comes with two Dust
Collector Adapters. Use the appropriate size
Dust Collector Adapter for the vacuum hose
you want to connect.
1. Set the “ON-OFF” Switch to the “OFF”
position.
2. Unplug the Power Cord from the power
source.
3.
.
If you are using the Small Dust
Collector Adapter, connect the large
end to the Dust Collector. Figure 2
.
If you are using the Large Dust
Collector Adapter, connect the small
end to the Dust Collector.
4. Firmly insert the vacuum hose end into the
open end of the Dust Collector Adapter.
5. Make sure all connections between the
Arrow Saw, Dust Collector Adapter and
vacuum hose are secure.
FIGURE 1
FIGURE 2
Dust
Collector
Adaptor
Vacuum
Hose
Dust
Collector
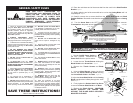
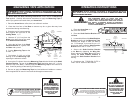
THROUGH CUTS
1. Set the On/Off Power Switch to
the “OFF” position. Disconnect the
Power Cord from the power source.
2. Loosen the two Thumb Screws
holding the Blade Shield to the
Arrow Saw. Figure 6
3. Remove the Thumb Screws and Cutting
Blade Shield.
4. Using an Allen Wrench, loosen, but do not
remove, the Socket Head Cap Screw securing
the Arrow Shaft Guide to the Base. Figure 7
5. Adjust the Arrow Shaft Guide until the
Cutting Blade extends about 1/16” PAST a fully
cut arrow shaft. Figure 7
6. Firmly tighten the Socket Head Cap Screw
to secure the Arrow Shaft Guide to the Base.
7. Replace the Blade Shield. CAUTION:
NEVER OPERATE THE ARROW SAW
WITHOUT THE BLADE SHIELD SECURELY
MOUNTED IN PLACE!
8. Secure the Blade Shield to the Arrow Saw
with the Thumb Screws.
9. Check cutting depth to verify no movement
occurred while securing the Arrow Shaft Guide
or replacing the Blade Shield.
10. Verify the On/Off Power Switch is in the “OFF” position and connect the Arrow
Saw to the power source. Turn the attached vacuum on.
11. Turn on the Arrow Saw and allow a few seconds for the Motor to reach full
speed.
WARNING: ALWAYS stand clear of the Cutting Blade during start up.
There are two methods you can employ to cut arrow shafts. One method is a
THROUGH CUT, for quickly cutting arrow shafts. The other is a ROLL CUT, for
more precise, cleaner cuts.
FIGURE 6
Blade Shield
Thumb Screws
FIGURE 7
Arrow Shaft
Guide
Arrow Shaft
Guide
Socket Head
Cap Screw
Cutting
Blade
1/16”
PAST
a fully
cut
arrow
shaft
-8-
WARNING! Before cleaning, assembling or disassembling the Arrow
Saw, make sure it is turned OFF and the PLUG IS REMOVED FROM THE
OUTLET/POWER SOURCE!
Arrow
Shaft
CAUTION ROTATING SHARP BLADE!
Toavoidsevereinjurykeepngers,handsandotherforeign
objectsclearofthesawopeningBladeandMovingPartsofthe
ArrowSaw.WearapprovedSafetyGlassesandKevlarGloves
whenusingtheArrowSaw.